Colin M
-
Posts
386 -
Joined
-
Last visited
-
Days Won
3
Content Type
Profiles
Forums
Events
Store
Gallery
Tutorials
Lexus Owners Club
Gold Membership Discounts
Lexus Owners Club Video
News & Articles
Everything posted by Colin M
-

Amayama Delivery
Colin M replied to Colin M's topic in LS 400 / Lexus LS 430 / Lexus LS 460 / Lexus 600h / Lexus 500h Club
Have you taken into account the cost off delivery from Japan, Mike? My item cost (to the nearest pound sterling) £28 and delivery from Japan was £20, making the total of £48. Is the cost of your ignition switch £32 or does the £32 cover cost of the switch and its delivery? I entered my details into www.dutycalculator.com to see what the Import VAT should be and it came out at £9.60, so how HMRC calculated £8.80 I do not know. You can enter your details into the website - there are 3 free calculations. -
Amayama Delivery
Colin M replied to Colin M's topic in LS 400 / Lexus LS 430 / Lexus LS 460 / Lexus 600h / Lexus 500h Club
Of the £22, I think the £13.50 fee is more or less a standard figure irrespective of the cost of the item imported. The remaining amount is Import VAT and so presumably will be affected by the cost of the item i.e. the more the item (and delivery) costs, the higher the amount of Import VAT. My Import VAT was £8.80 which is about 20% of the cost of the item and its delivery (which was just under £48). The normal rate of VAT is 20% and what I paid is actually a bit less than 20% (£9.60 would be 20% of £48). I am not sure why I paid 80p less than £9.60. -
Amayama Delivery
Colin M replied to Colin M's topic in LS 400 / Lexus LS 430 / Lexus LS 460 / Lexus 600h / Lexus 500h Club
I now have had the item delivered and here is an update on how things went. Nothing happened before Christmas but on 27 December I received a letter from Parcelforce, dated 23 December, stating that the item had cleared Customs. The letter indicated that no Customs Duty was payable but Import VAT of £8.80 was payable, along with a Clearance Fee (zero rated for VAT purposes, you will be pleased to know ...) of £13.50. So, in all £22.30 to pay. The letter stated that 'So we can deliver your parcel as quickly as possible to you, the easiest way to go online to arrange payment of these Customs charges. If you pay online, delivery is usually made the next working day after payment is processed'. OK, so I pay straightaway on the same day. A dropdown menu gave me a choice of delivery dates, the first one of which was 30 December (presumably because Monday 29 December would be the day payment was processed and delivery could then be the next working day). Since we were out most of the 30th, I selected the following day 31 December as we were in all day until early evening. 31 December came and went without any delivery. So I rang Parcelforce on 2 January but not by using their premium rate number of 0844 2096159. If you have not come across the www.SAYNOTO0870.com website, it is well worth a look for alternative numbers. Typing that number in came up with 02476 817101, which apparently only worked after 5 pm, and 02476 213458. I tried the latter number as I was ringing in the morning and it worked fine. Pressing 1 on the menu took me straight through to a person who could deal with my query. I explained that I was expecting a delivery on 31 December and was asked for the parcel's tracking number. The person I spoke to said that the parcel was being held in Birmingham awaiting payment of customs charges. So I told her that these had been paid on 27 December and I had received an email the same day confirming payment and indicating that the parcel would be released for delivery. She checked on the system and said, yes, the charges had been paid. She would contact Birmingham office but it would be Monday before it could be delivered. I said that was OK as I would be in all day Monday. At 8.45 on Saturday morning, the doorbell rings and a man from Parcelforce arrives with the item. While it was good to get the parcel on Saturday rather than wait till Monday, the parcel needed signing for and no-one had checked with me whether I would be in on Saturday. It would have been easy to check as my phone number was on the paperwork on the outside of the parcel ... So, in all, it was about a month from ordering the item to delivery. I ordered it on 3 December and paid for it on 5 December. it was sent from Japan on 12 December and arrived 4 days later in Customs on 16 December. Things went smoothly up until that point but, as you can see from the above, less smoothly thereafter. In sum, Amayama Trading/Japan Post 1 HMRC 0 ... I have set out the information above because it may be helpful to anyone who has not used Amayama before but who might be thinking of doing so. This has not put me off buying again from Amayama. The item was well packed and even with postage and customs charges was less than half the price I would have paid for the item here. -
Amayama Delivery
Colin M replied to Colin M's topic in LS 400 / Lexus LS 430 / Lexus LS 460 / Lexus 600h / Lexus 500h Club
Thanks, guys, for all your help with this. I think I will leave chasing it up till after Christmas now, unless it turns up of its own accord beforehand. -
Amayama Delivery
Colin M replied to Colin M's topic in LS 400 / Lexus LS 430 / Lexus LS 460 / Lexus 600h / Lexus 500h Club
Thanks for your responses. I am not in any rush to get the item so I will wait a while longer before trying to make contact. Having looked on Google for the phone number for Coventry Parcelforce, there are quite a few posts on different websites about the difficulty of getting through on the phone to anyone ... -
I would be grateful if anyone who has used Amayama before could give me some advice on what happens at this end when the item has come into the country. I have an item that has been sent via Japan Post and I have been emailed delivery information which includes a Tracking Number. I have been on the Japan Post website and entered the tracking number. The item is in customs at Coventry Parcelforce (arrived there on 16 December 2014). Please can someone advise me what happens next? Do I need to do anything or will it somehow just arrive at the house? Thanks. Colin
-
Following Malc's reference to the recall being in February 1998, I have had a look online to see if I could find out why there was a recall. I have discovered the reason for the recall was as follows: DUE TO IMPROPER ASSEMBLY OF THE TERMINAL FOR THE STARTER MOTOR MAGNETIC SWITCH, AN ELECTRICAL SHORT CIRCUIT CAN OCCUR IF ELECTRICALLY-CONDUCTIVE LIQUID, SUCH AS ROAD SPLASH WITH DEICING SALT, ENTERS THIS AREA. According to one website (http://www.arfc.org/autos/lexus/ls400/recalls/000008519000074548000000204/recall.aspx), the recall relates to vehicles manufactured between 4/3/1995 and 6/4/1997 (47,525 vehicles).
-
No, Malc, I don't. I planned to ask the service manager when I collected the car but he was not there. I asked his assistant who looked on the system and said that there was no indication of the date of the recall, But he did say that the recall was valid until 2020, so it does not look as though it runs out anytime soon! I guess it will depend on whether cars have been taken back in the past for the recall work to be done. Presumably if they have, the recall then disappears off the system. When I took my other LS in for the key programming, it was logged onto the computer and there was no mention of any recall work outstanding for that car. For some reason, my 1997 car must not have been taken back for the starter motor recall work, so it still showed up on the system. It is certainly worth getting your car checked on the system if you can - you never know, you might have the same good fortune that I had.
-
I visited a Lexus main dealer initially to get a spare key programmed for my 1996 LS400 (which they were unable to do but put me in touch with someone who could) and, while I was there, I enquired about the cost of looking into a charging fault which had just arisen on my 1997 car. I decided to bring the car in for them to look into the charging fault, which turned out to be a good move as the fault was not easily diagnosed. It was an intermittent fault with the alternator, not discovered on initial removal and testing and only apparent after a further removal and testing. Fitting a reconditioned unit sourced by the dealer sorted the problem (new units not being available). So, what was the unexpected benefit from the visit? Well, when I went to pick the car up I was told that when the car was logged onto the computer system an outstanding Starter Motor Recall came up. The Lexus Warranty Department, when contacted, indicated that new parts, including a new solenoid, should be fitted by the dealer to the starter motor at no cost to the customer. The parts were duly ordered and when they arrived the car was booked in for the starter motor to be removed, new parts fitted and starter motor then refitted. As many of you will know, removal of the starter motor is not a small job as it is located in the V section between the two banks of cylinders. Doing the work went over into a second day and, while the dealer had the car, I was given a courtesy car to drive. This was a CT200h, so I had the chance to see what driving a hybrid was like. It enjoyed driving it but was pleased to get back behind the wheel of the LS when it was ready to collect. I have the service history on the LS and there is nothing to indicate that any work has ever been done on the starter motor, which seems to have been starting the car fine for all of its 215,000 miles. But inevitably there must have been some wear on the solenoid contacts, so the opportunity of getting a new solenoid fitted for free was too good to turn down. Well done to Lexus for doing the work under the Warranty Scheme! I wonder how many other manufacturers would have done this on a 17 year old car. Hopefully, with the new parts fitted, the starter motor will continue to start the car for the next 215,000 miles (and if I am still driving it then that will be even better) ...
-
Well done, Jonathan, and I have made a mental note of a faulty bulb causing the parking brake light to be permanently on, as I didn't know this. Best wishes to all for Christmas and the New Year. Colin
-
Thanks, Mike, I have benefitted a lot from the help of others on the Forum so it is nice to be able to contribute a bit back. Looking foward to Santa arriving ... Colin
-
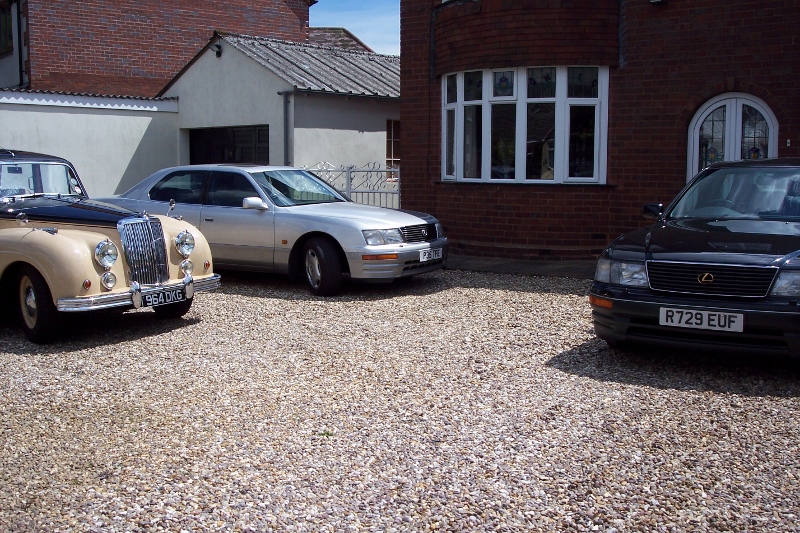
A Couple Of Ls's
Colin M replied to Angel123's topic in LS 400 / Lexus LS 430 / Lexus LS 460 / Lexus 600h / Lexus 500h Club
Good photos and nice to see two parked together. I rarely see any other LS400s when I am out in mine. I have found silver to be a very forgiving colour when it comes to not showing up the dirt. It never seems to look as dirty as darker colours do. -
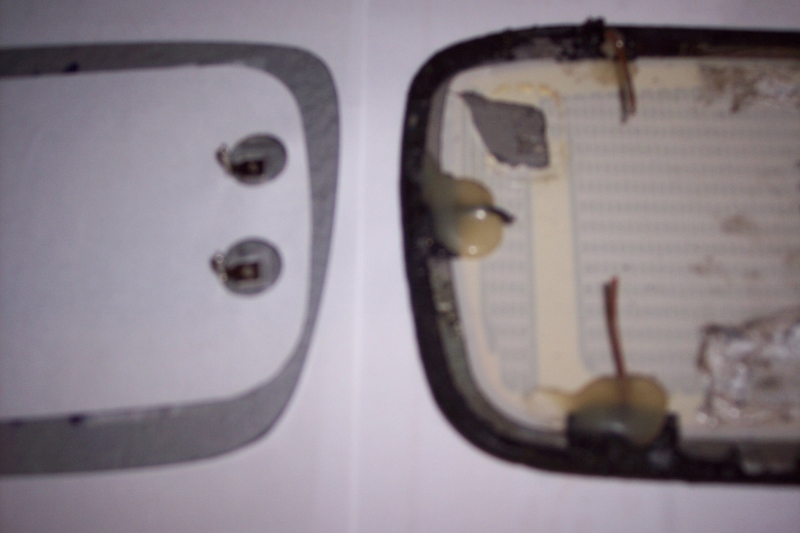
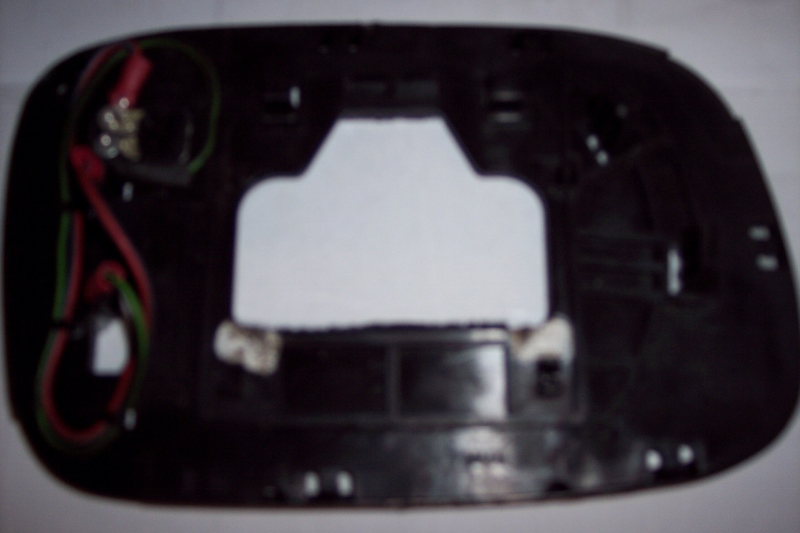
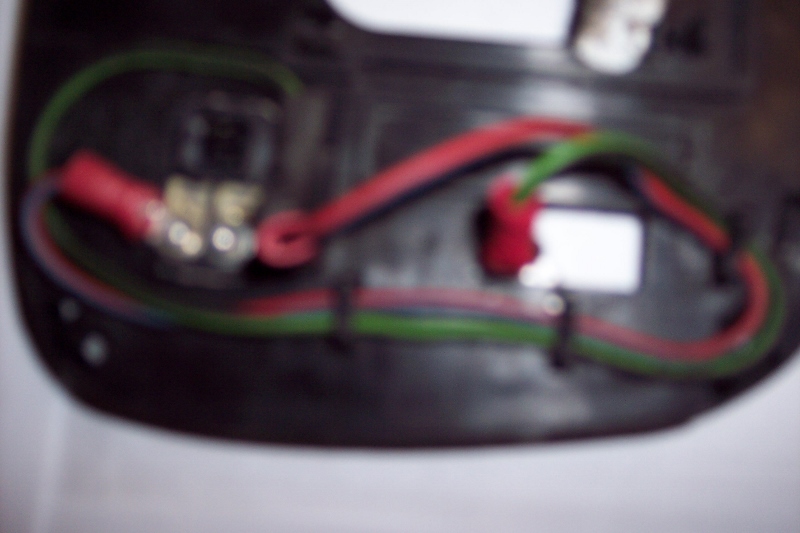
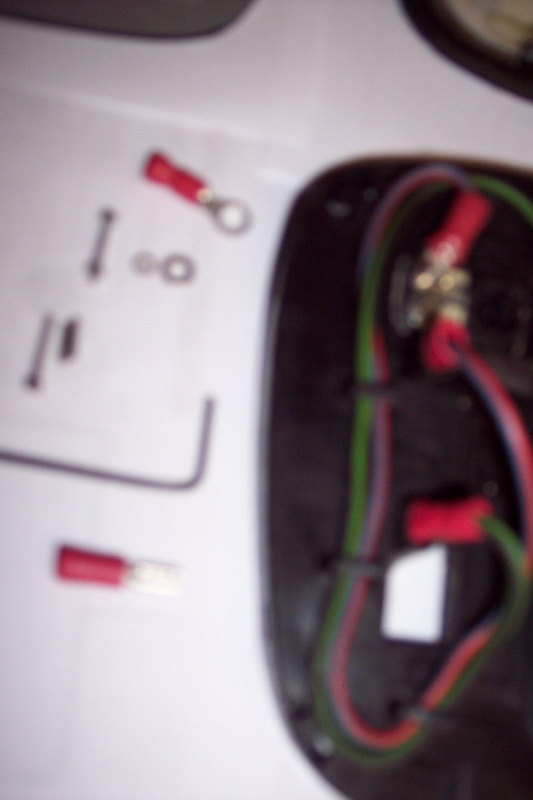
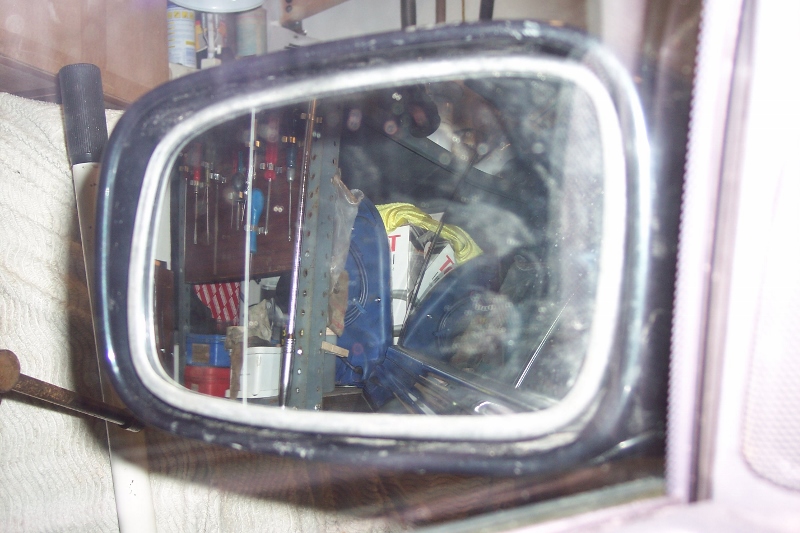
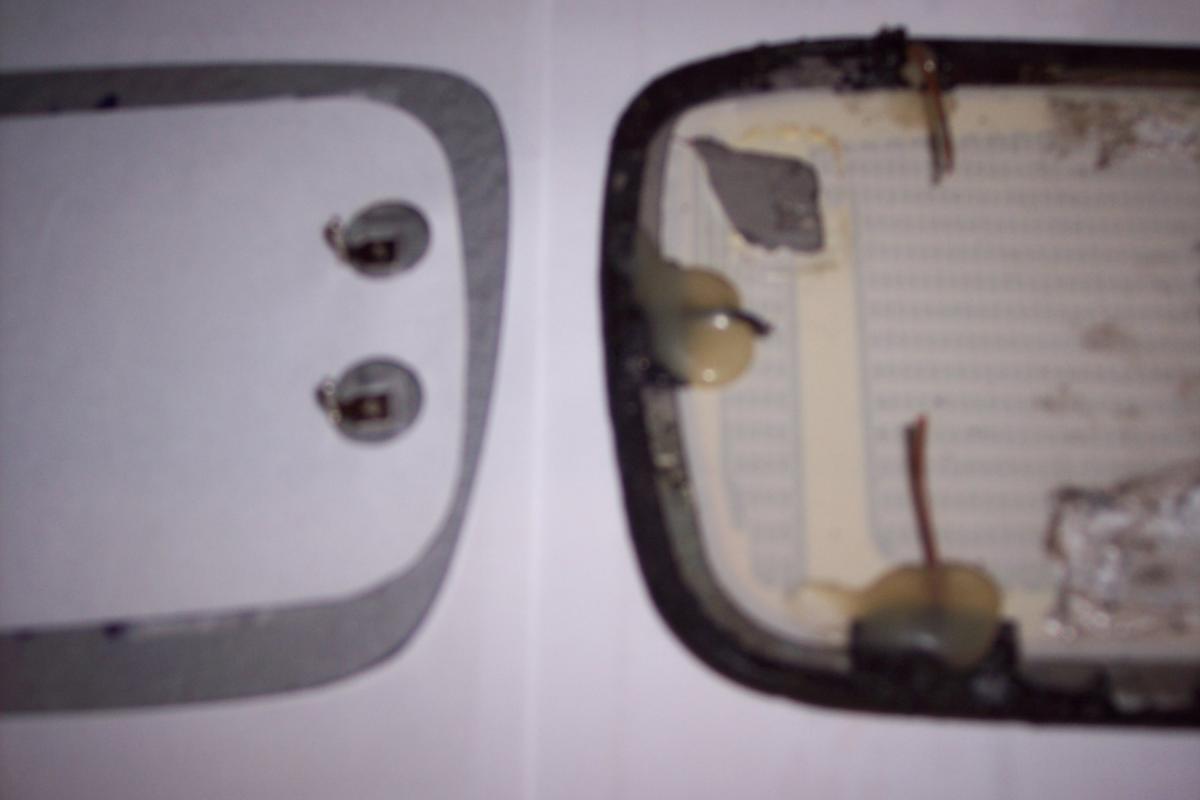
Paul, thanks for the link to the eBay mirrors. I have in fact already purchased two of these, passenger and driver side, and have just finished fitting the passenger one. I have set out below a description of how I went about doing this, with a few photos of what is involved, in case this is of interest to anyone else who might be thinking of fitting this non-original heated mirror. The Mirror Glass Purchased The mirror glass I bought was from Car Parts Market Ltd (eBay ID: car-parts-market) and the item was described as a Passenger Left Side Wide Angle Heated Wing Mirror Glass for Lexus LS400 95-00. The cost is £10.99 with free postage/packing. There was a Buy 1, Get 1 at 50% off, however, so I decided to buy a Drivers Right RHS mirror as well for the other side to be fitted if and when needed (at a total cost of £16.48 for the two). Removal of Existing Mirror Glass The existing mirror glass and its backing plate were removed by inserting the tip of a screwdriver between the bottom of the mirror (backing plate) and the mirror housing, in the middle about half way along, with a rag round the screwdriver tip to protect the mirror housing. Lever the screwdriver downwards to force the backing plate forward. This releases the two plastic clips on the backing plate from their location in the bottom of the (white) mirror electric adjustment plate. This is basically a push-fit method of retention but the clips do not release easily and a fair amount of pressure needs to be applied. Once released, the mirror can then be pivoted upwards from the bottom so that it is horizontal. This releases the two “J” clips holding the mirror backing plate to the top of the mirror electric adjustment plate and the mirror plate can then be pulled forward from the mirror housing. There is a small plug with two wires (black with red and black with green) around the top left hand corner of the backing plate and this is the heater plug. Pull it off the twin pins attached to the mirror glass (two pins close together). You will also see other wires - two brown and one blue – but leave these for the moment until you have separated the mirror glass from the backing plate. Separating the Existing Mirror Glass from the Backing Plate In order to separate them, the black plastic cover around the edge of the glass (the bit that looks white in Photo 5 – see below - showing the new mirror glass fitted...) needs to be removed. This is pushed on over the mirror glass from the front and there are several small rectangular slits in it (about 5 mm long and 1 mm wide) around the back edge of the cover. These fit into raised sections on the backing plate to hold the cover in place. The cover is removed by levering the edge of the cover up and forward at each of these sections using a small screwdriver. Once all are released the black plastic cover can be pulled off the front of the glass. The mirror glass will still be stuck onto the backing plate and will need to be gently levered off. The places where mine was stuck were centrally at the top and bottom edges of the mirror – a smaller strip at the top about 30mm x 7mm and a larger one at the bottom about 50mm x 20mm. The mirror could be easily separated from the white adhesive substance used to hold it in place. You can see the white adhesive on the old mirror glass in the Photo 1 at the extreme right hand edge of the picture. You can also see in Photo 1 two brown wires and one blue one attached to the glass. My guess is that this wiring is for the mirror’s auto-dimming function. As my replacement mirror has no auto-dimming, these wires were not needed so they were cut off and taped up. I did remove the clear silicon covering the wire to mirror glass join on the brown wire on the top edge of the mirror to see if the wire could be pulled off at the connection but it could not. It looked like a small spade connector was used but with a dab of solder on it to prevent it coming apart. So the wires were cut instead. The wires have been pushed into a wiring sleeve and placed at the back of the mirror housing so they can still be used in future if someone wants to fit an OE mirror glass. Removing the Twin Pin Connector from the Existing Mirror Glass The mirror on the left hand side of Photo 1 is the new mirror glass (it’s actually the drivers’ side glass not the passenger side, as I had already fitted the passenger side glass when I took this photo). You can see that the new glass has two separate connection terminals for the heated element which are some distance apart, whereas the original has twin pins close together onto which the small two wire plug is fitted (as indicated above). I decided to use the wire plug and twin pin connector attached to the original mirror glass if possible (it was) and make up connecting wires between the twin pin connector and the terminals on the new mirror glass. Below each of the twin pins is a metal connector. This has a thin layer of white silicon covering it and if you scrape this away you will see the metal connector underneath it. The other side of the connector is attached to the glass. You can see what the connector looks like by looking at the top right hand corner of the mirror glass in the photo I posted up when starting this thread in September. Each connector is a piece of metal with what look like two pin heads in it, one above the other. The pin connectors can be levered apart from the glass, but they don’t part company easily and care needs to be taken so that they remain intact. I found using a small screwdriver to be the most effective means of forcing them apart. In the photo of the (new and) old mirror glass, the grey section in the top left hand corner of the old mirror glass shows from where the connectors were removed. They were at the bottom of the grey section. By chance, the section removed extended upwards to include a plastic ‘flap’ of material as well. Try to do this if you can, as it proved useful later. I put this on one side till I had done the next job of making the new mirror glass fit on the backing plate. Positioning the New Mirror Glass on the Backing Plate To correctly position the new mirror glass on the backing plate, cut outs in the plastic backing plate need to be made so that the two separate connection terminals protrude through and the glass fits flush with the backing plate. The terminals are quite close to existing cut outs (the top one is for the heating wire plug) and I found it easiest to extend these cut outs so that the terminals went through. I used a small coarse square file to extend the cut out in the direction needed e.g. extending the top cut out downwards. Once this has been done, the twin pin connectors removed from the old mirror glass can be turned 90 degrees to the right from their normal position and can be trial fitted into the top cut out. Insert the ‘flap’ of material behind the backing plate on the right hand side of the cut out and the other end of the connectors can then be pressed inside the left hand side of the cut out. I found that this made a flush fit which held the connectors firmly in place. I removed the connector when satisfied with the fit. With the glass correctly positioned and flush with the backing plate, I did a trial fit of the black plastic cover around the edge of the glass. Then I marked the position on the big (white) area of the back of the mirror that is visible through the backing plate – see Photo 2 - so I knew where it needed positioning to stick it in place. To stick mine, I removed most of the white sticky substance and replaced it with another similar strip that I had. In the position where these stick to the new mirror glass, I removed the covering paper from the new mirror to reveal the adhesive strip underneath (belt and braces approach ...). I decided against removing all the covering paper, which extended over most of the mirror, as much of the adhesive would not be in contact with anything. I pushed the mirror glass onto the backing plate, making sure it was correctly positioned, and pressed firmly on the sections where the adhesive was. I then put the black plastic cover over the front of the mirror glass and pressed the rectangular slits into the raised sections of the backing plate to hold it in place (see above). Wiring the Twin Pin Connector to the New Mirror Glass Terminals The two separate terminals on the new mirror glass each needed to have a wire attached to them, with one wire going to one of the twin connectors and the other wire going to the other connector. I did not have any wiring that was the same colour as the wiring on the small plug (black with red and black with green) so I used the nearest I had which was red with blue and green with black. The wire was connected to the terminals on the new mirror glass using a (female) 2.8mm spade connector used for radio speakers etc. This was crimped onto the end of the wire and the connector opened up a little using a small screwdriver inserted into the connector end, as the (male) connector on the mirror glass was too thick for it to fit on without doing this. I crimped a small ring connector onto the other end of the wire. The plan was to connect these wires to the twin connectors by drilling a small hole through the centre of the lower pin head on each of the two connectors (i.e. the pin head furthest away from where the wire plug pushes into the twin pins) and then using a micro nut and bolt to fasten the ring connector. I used a very small drill (starting with a 0.5mm one) to drill a hole and increased the size of the hole to 2mm. I sourced some micro nuts and bolts locally at an engineers’ merchant, EC Pitchers in Walsall (they have a website: www.ecpitcher.co.uk). The only 1.5mm thick bolts they had were about twice as long (13mm) as I needed but I was able to cut them down with a small hacksaw after fitting them. They had an allen key head and the width of the bolt head was 3mm, which meant I needed to use a couple of small washers to prevent the bolt head going through the ring connector, and the nut fitted OK on the other side of the 2mm hole as it was 3.1mm wide. Photo 3 (a bit blurred) shows the wires connected up. The red plastic sleeve on the green wire ring connector was removed and replaced with a thin black sleeve because of restricted access for the green wire. Photo 4 shows a second view of the connections with the materials used on the left of the photo – from top, a small ring connector; a micro bolt with nut screwed on the end and to the right the two small washers used to prevent the bolt head going through the ring connector; a micro bolt without a nut and to the right the two sections of bolt cut off after fitting (this looks like one thicker piece but is the two sections next to each other); the allen key for tightening the bolt; and a (female) spade connector. You will see on both Photos 3 and 4 that the lower spade connector has been bent so that it projects inwards to the centre of the backing plate. The connector was removed from the mirror terminal to bend it and then refitted. The reason it was bent is that, when the backing plate is fitted onto its mountings in the mirror housing, there is a section of metal in the housing which is in the way. Without being bent, the connector may be damaged when re-attaching the backing plate in the housing and/or the section of metal may prevent the mirror being attached properly. Refitting the New Mirror Glass and Backing Plate I connected the small two pin heater plug to the twin pins, held the mirror horizontally to insert the “J” clips, lowered the bottom of the mirror down and then firmly pushed it into place. The mirror glass as fitted is shown in Photo 5. The job took some time to do and was quite fiddly but, provided the heater element works, it will have been worth the effort. Even if it doesn’t, at least I now have a mirror through which I can see properly!!

-
Paul, thanks for the link to the eBay mirrors. I have in fact already purchased two of these, passenger and driver side, and have just finished fitting the passenger one. I have set out below a description of how I went about doing this, with a few photos of what is involved, in case this is of interest to anyone else who might be thinking of fitting this non-original heated mirror. The Mirror Glass Purchased The mirror glass I bought was from Car Parts Market Ltd (eBay ID: car-parts-market) and the item was described as a Passenger Left Side Wide Angle Heated Wing Mirror Glass for Lexus LS400 95-00. The cost is £10.99 with free postage/packing. There was a Buy 1, Get 1 at 50% off, however, so I decided to buy a Drivers Right RHS mirror as well for the other side to be fitted if and when needed (at a total cost of £16.48 for the two). Removal of Existing Mirror Glass The existing mirror glass and its backing plate were removed by inserting the tip of a screwdriver between the bottom of the mirror (backing plate) and the mirror housing, in the middle about half way along, with a rag round the screwdriver tip to protect the mirror housing. Lever the screwdriver downwards to force the backing plate forward. This releases the two plastic clips on the backing plate from their location in the bottom of the (white) mirror electric adjustment plate. This is basically a push-fit method of retention but the clips do not release easily and a fair amount of pressure needs to be applied. Once released, the mirror can then be pivoted upwards from the bottom so that it is horizontal. This releases the two “J” clips holding the mirror backing plate to the top of the mirror electric adjustment plate and the mirror plate can then be pulled forward from the mirror housing. There is a small plug with two wires (black with red and black with green) around the top left hand corner of the backing plate and this is the heater plug. Pull it off the twin pins attached to the mirror glass (two pins close together). You will also see other wires - two brown and one blue – but leave these for the moment until you have separated the mirror glass from the backing plate. Separating the Existing Mirror Glass from the Backing Plate In order to separate them, the black plastic cover around the edge of the glass (the bit that looks white in Photo 5 – see below - showing the new mirror glass fitted...) needs to be removed. This is pushed on over the mirror glass from the front and there are several small rectangular slits in it (about 5 mm long and 1 mm wide) around the back edge of the cover. These fit into raised sections on the backing plate to hold the cover in place. The cover is removed by levering the edge of the cover up and forward at each of these sections using a small screwdriver. Once all are released the black plastic cover can be pulled off the front of the glass. The mirror glass will still be stuck onto the backing plate and will need to be gently levered off. The places where mine was stuck were centrally at the top and bottom edges of the mirror – a smaller strip at the top about 30mm x 7mm and a larger one at the bottom about 50mm x 20mm. The mirror could be easily separated from the white adhesive substance used to hold it in place. You can see the white adhesive on the old mirror glass in the Photo 1 at the extreme right hand edge of the picture. Sorry, I am trying to post this up in sections with photos interspersed and it has not worked as intended. I will try again with a fresh post!! IF SOMEONE KNOWS HOW I OR ANYONE ELSE (E.G. STEVE) CAN DELETE THIS POST, PLEASE LET ME KNOW. THANKS!!
-
I have had some paint mixed for my silver LS400. The smallest quantity that paint factors will mix is usually half a litre and it cost me about £20. Ask them for single pack acrylic or cellulose. I had some colour matched silver paint mixed at the same time for the wheels. I have not been able to find a paint code for the wheels. Does anyone know if there is one? I had an aerosol can filled with the wheel paint and what was left from the half litre paint mix was put in a tin. I think the aerosol cost about £6 in addition to the £20 for the paint. I resprayed a couple of the wheels and did small localised repairs on the others using a small brush. They look OK at a distance and you can only see the paint touched in if you get close up. As Phil says, it does take ages to do but it makes the car look a lot better.
-
As an alternative to buying parts from Lexus dealers, you could buy parts from Amayama Trading in Japan. They supply OEM parts for the LS400. See www.amayama.co.jp/help for details. If the screen comes up in Japanese, click English version at the top of the page. The prices can sometimes be significantly cheaper that Lexus dealers, even allowing for postage costs. I have just bought a rear suspension trailing arm strut bar for just under £28 plus £20 delivery. I may have to add a few quid on for import duty, taking it into £50 plus territory, but this is probably a third of the price I would pay if buying at a Lexus dealer in the UK.
-
Spring Has Sprung
Colin M replied to lordturns's topic in LS 400 / Lexus LS 430 / Lexus LS 460 / Lexus 600h / Lexus 500h Club
I have a KYB front spring on one of my LS400s, which was fitted about 12 months ago to replace a broken one. Good quality item and would not fit anything else. -
Sorry to hear about the vandalism. I had some front end vibration due to an unbalanced wheel. It might be worth changing the front tyres, one at a time, with the rear tyres to see whether the vibration disappears. It did when I swapped mine over. One of the wheels turned out to be out of balance, which did not really show up when it was on the back of the car. It has since been balanced properly.
-
It may be worth getting the alternator checked out to see whether it is charging all the time or only intermittently. I had a similar problem on my Mk 3 LS400 recently. The battery ran flat and the car ground to a halt. I put a spare fully charged battery on to get it home, recharged the original battery, started the car and put a voltmeter across the battery. It read 14.8 volts so I assumed the alternator was charging OK and the battery was at fault. I bought a new battery but this ran flat when I was out in the car shortly afterwards. A sixth sense told me that was not going to be an easy fix so I decided to book it into Lexus to get them to check out the alternator and wiring connections. This turned out to be a good move as the alternator had to be removed and refitted twice to discover that it charged Ok when the engine was cold but only sometimes when it was hot. The intermittent charging was due to an internal fault. A replacement alternator has now solved the problem.
-
Thanks, guys, for your comments - perhaps the most important lesson is don't lose keys in the first place!!