Leaderboard


Popular Content
Showing content with the highest reputation on 03/12/2016 in all areas
-
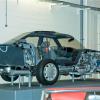
So I got bored with the switches on the steering wheel. They seemed quite basic to me and seemed to blend in too much with the rest of steering wheel material. So I decided to change it to carbon fibre style. So I thought I would compile a DIY guide on how to remove the steering wheel switch controls and wrap them in 3M Di-Noc Carbon Fibre Vinyl Wrap. Firstly, I'd like to say that I was never actually a great fan of these Carbon Fibre Vinyl Wraps. I always thought they looked quite cheap. Until I purchased a small 20x30cm sample and saw the actual 3D texture that they have. It's not a printed carbon pattern. The film actually has an embossed finish resembling true carbon fibre, which reflects light really well and changes the highlights of the pattern depending on the viewing angle. The only disadvantage to this product is that it is a matte finish. If you are looking for a true carbon fibre glossy finish, then the only option is to skin it with carbon fabric using the following method: This is something that I might do in the near future. But for now I am very happy with the 3M method. It meets my cheap and cheerful mods criteria :D So lets begin... TOTAL COST FOR THIS MOD: £3.99 TOOLS/MATERIALS NEEDED: * 3M Di-Noc Carbon Fibre Vinyl Wrap (For this mod you will not need anything bigger than 20x30cm's. I purchased a CA-421 - Black 30x20cm sheet from eBay member carbonfibergeneration for £2.99 + £0.99 P&P) * 200 Grit sandpaper * Sharp utility knife * Hairdryer or Heatgun * 2 small zip/cable ties * Socket Wrench with T30 Torx Socket * Socket Wrench with 10mm Socket Step 1: DISCONNECT CABLE FROM NEGATIVE BATTERY TERMINAL (Using a 10mm Socket Wrench) Step 2: Press down brakes and wait for 90 seconds after disconnecting cable from negative terminal to prevent airbag deployment. Step 3: Using a flat-head screwdriver wrapped in tape, remove the two side steering wheel covers. (Left-side cover is pictured below) Step 4: Using a "torx" socket wrench (T30), loosen the "torx" screws (1 on each side) until the groove along the screw circumference catches on the screw case. Step 5: Pull out the steering pad (airbag unit) from the steering wheel assembly and support the steering pad with one hand (You do not have to remove the airbag. Holding it with 1 hand gives you enough room to remove the switches). Step 6: Remove the 2 phillips screws (one one each side) that hold the switch modules onto the steering wheel. Step 7: Gently pull the switch module out. If the connector is zip tied to the module, cut the zip tie being very careful not to cut the wire. Then remove the connector and your module will be out. - REMEMBER - When you re-install this module, you will need to use a new zip tie to secure the connector cable. Step 8: Next you need to take out the buttons/switches. To do this, turn the unit upside down and remove the 3 phillips screws: Step 9: Pull out the cover as pictured below: Step 10: Keep the circuit board held down with a finger or 2 and gently turn the unit around. Push the buttons gently so that the buttons starting poping out. The purpose of holding down the circuit board at the same time is so that while you are pushing the switch out and the unit is turned around, the small components inside the buttons dont all get seperated and fall out. Step 11: Put the removed switch buttons aside, making sure that the buttons are not seperated from the circuit board. Step 12: Now you are left with the following bare shell: Step 13: Next you want to cut-out 2 pieces from your 3M Carbon Fibre Vinyl. I wanted to make sure that for the left switch I cut a piece that had the pattern going from bottom right corner to top left corner. And for the right switch I wanted the pattern to go from bottom left corner to top right corner. As pictured below: Step 14: Next, you will need to sand the openings for the switches slightly. If this step is not done, then your buttons will be very sticky and may not work properly. Gradually go around the openings with 200grit sandpaper. Dont rush, take your time and do it evenly so that you get consistent gap throughout. Once this is done, give it a clean. Step 15: Next you will need to have your utility knife and a hairdryer or heatgun ready: Step 16: Gently apply the 3M wrap and use your hairdryer to heatshrink and get a perfect wrap around corners and curves. Please watch the following youtube video, which shows how to heatshrink and apply the 3M vinyl: Thats it... you are now done with it and ready to put back the buttons and install everything into the car in reverse order. REMEMBER: Take your time on the wrapping procedure and do it properly. DO NOT RUSH. The vinyl is very forgiving. If it looks wrong, lift it and apply it again with some heat. Once everything is installed back into the car and the airbag unit is put back in, you can re-connect the negative terminal on the battery. Below are some photos of my wrapping process and my final installed photos1 point
-
Hi Guys, Not been on here in ages. I had some issues with my password a while ago and never got round to sorting it until tonight. Still have my ISF. It will hit 70k miles by next week. Fortunately as we all know with these cars I do not have anything to report as it has not put a foot wrong since the water pump was changed under warranty. Still throughly enjoying the car and look forward to driving it everytime. Early this Weeke I drove to Geneva via France for the motorshow and it was a great drive there and back. It eats up the miles no problem. This year I bought some winter tyres for it and the two occasions we have had snow it has been perfect. I have not got stuck once and it was quite bad snow up here the last time we had it. So what have I been up to, well since my last post on here which was in 2015, I have since got into drifting. I tend to go drifting once a month in Birmingham and will be at the teeside auto drone in April and no I do not drift the ISF! I have got a e36 compact which is set up for drifting and I have also bought a road legal e36 which again is set up for drifting. I had a quick scan of recent posts and I would like to say hi to the new people that have joined. You will thoroughly enjoy the ISF I can assure you of that,you made the right decision with this car! Sully1 point
-
took her for an MOT today, passed, no advisories! thats two passes in a row now1 point
-
The turnout is always impressive at Malton. It's hosted by Specialist Cars of Malton who have a lot of high end stock on display. A fair few supercars turn up too as well as your usual mix of hot hatches, sports cars etc. I'll be there for around 08:30 on Easter Sunday. It's always better to arrive earlier so you can get a decent parking spot. There is a heavy police presence around the area due to some silly drivers from a few years back so keep an eye out on your speed.1 point
-
Inspired by the Scottish scenery framing a shiny green car I decided to give mine the same treatment today. The very good East Europeans did the hand wash and I applied the Autoglym, an excellent product (unless you put the bottle down too hard like I did so it shoots out all over your face!) Obviously my backdrop is a little more uninspiring.
 1 point
 -
Use either SRP or White diamond. They are both pretty much the same thing. The 845 would be OK if you are using the SRP or WD to polish the paint but if you're using them for filling it'll remove the fillers being solvent based1 point
-
Looks mighty fine! Inspiration to tackle the swirl marks and various blemishes on mine...1 point
-
Retrofitting adaptive cruise control I would hazard a guess its going to be arduous task, better of selling what you have a buying something with it standard.1 point
-
I s'pose text language doesn't help either ! but to get a name wrong, well, that's the first signs of .................... ... hahahahaha Malc1 point
-
Sorted the sunroof... I don't think there was a problem part from me being the idiot! You need to hold the slider button for a second and then let go of it and then the roof will slide forward or back until open or fully closed Anyhow it works so were all good... Now... the next problem. .. I have a clunking sound at the rear of the car? Seems to happen when I move off and more noticable after the car has been stood for a few days with the hand brake on But today I heard the clunk when I was out and about in the car So must be getting worse! My first thought was a sticky brake calliper but I am interested to know if this sounds like a common problem for the RX and if there are any suspension issues I have standard coil spring suspension. .. Thanks again for all the help with the roof...1 point
-
... and check your tyres. Happened to me. New tyres resolved the issue.1 point
-
Go to Lexus to have it done as they have a way to electronically adjust the steering wheel as well. My isf had an off centre wheel by a small margin.1 point
-
Simple answer is to contact your insurers to discuss how your premium might be affected by any changes you are planning. They are providing cover for vehicles with certain items fitted. If you then put larger wheels on, lower or stiffen suspension add LPG etc then you are changing the characteristics of the car and the insurers have a right to know and possibly revise their rating of the car. Contact them to get an idea of any increase and factor it into your costings for modifications.1 point
-
My understanding is that if the caster isn't symmetrical then the car will always to pull the one side, in your case the left. I'm having my alignment done in the morning so will see how mine compares. Currently it is pulling a bit to either side at times and that has resulted in some low speed kerbing on both sides. Last mot shows an advisory for inner tyre wear but I believe that is a common issue with our cars. I'll have a word with the mechanic and will show him your printout to see what he thinks.1 point
-
I've noticed the battery goes flat pretty quickly if the doors are open or the stereo is left on for an hour or 2 but when you think how many interior lights are on with doors open, dome light,puddle lights, seatbelt buckle lights, ignition lock light these do draw some current.1 point
-
Most likely to shift unsold cars. The ones they give deals on are undesirable anyway. Nobody wants an A4 Sport, they want S Line Nobody buys a passat all track. They just look daft1 point
-
Hey thanks all for your very good advice - as having dodgy moments with radio/windscreen wipers and reverse camera I forked out for the warranty if only so I can sleep at night! Really appreciate your comments on this - what a great forum you people have!1 point
-
Good stuff! I mentioned a couple of weeks ago that my old 93 LS, the first Lexus I had, just passed it's MOT with no advisories, 23 years old. You wouldn't get that from too many makes of car.1 point
-
there is a write up here on how to do it - it is in 2 parts - alot of dismantling required http://www.evansweb.info/2009/11/15/ls400-centre-console-illumination-repair-part-1/1 point
-
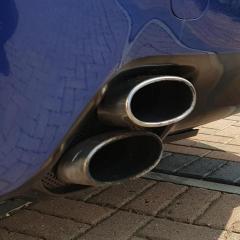
Just going through the same process on my current GS300 (2006). Rear exhaust + gaskets, springs, bolts and chrome tips came to £517 from Lexus Parts Direct, Swindon (free delivery). This was around £100 cheaper than the quote I got from the local main dealer. I was tempted to go down the stainless steel route again, but I need quiet in my dotage.1 point
-
Careful you don't polish all the paint off. She does look good though. I think the way you have constructed the studio as distressed inner suburbia is pure genius for a studio shoot. Mike.1 point
-
The thread that Stuart is referring to that includes South Wales propshafts is MOT Gloom started on 22 July 2015. It includes details of the relevant replacement rubber boot.1 point


(Copy)(4).thumb.JPG.71a827ba0ed7b9343ae59efcf2a8c0b2.JPG)