Leaderboard


Popular Content
Showing content with the highest reputation on 10/22/2015 in all areas
-
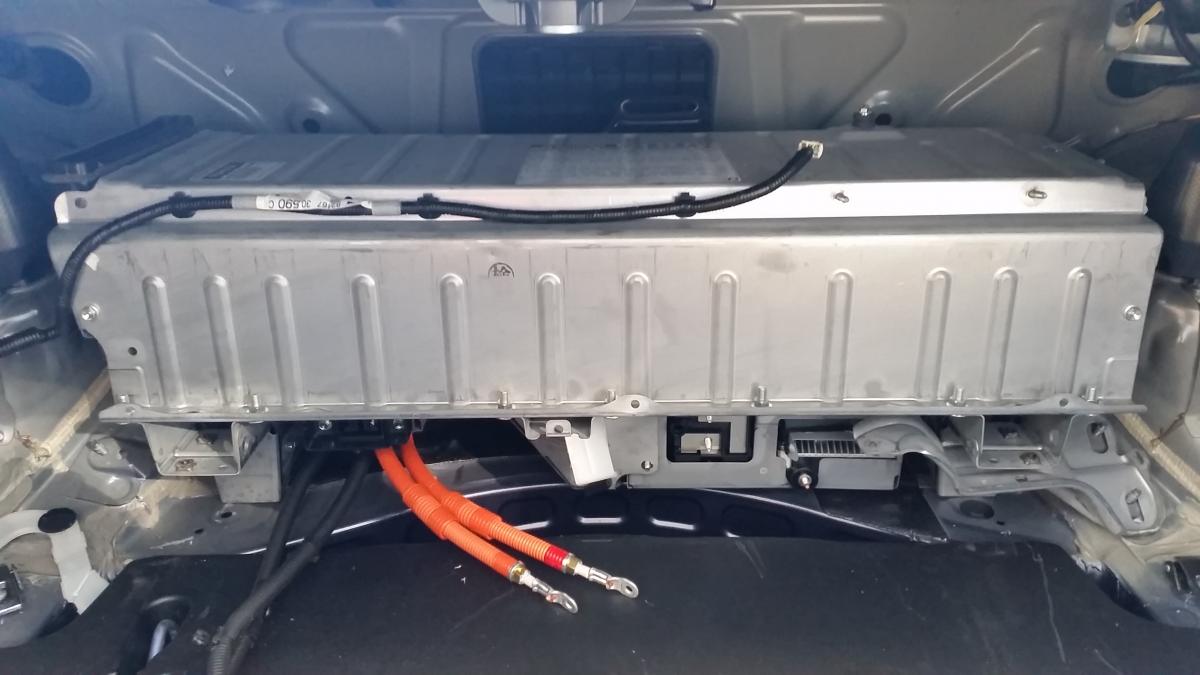
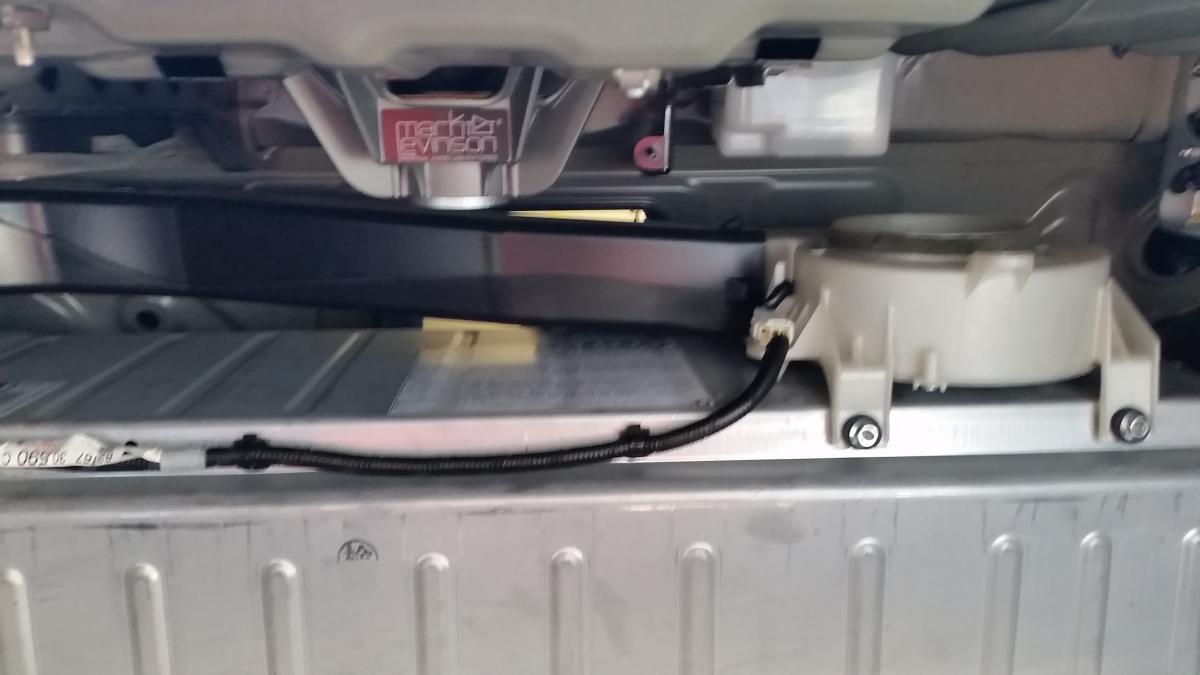
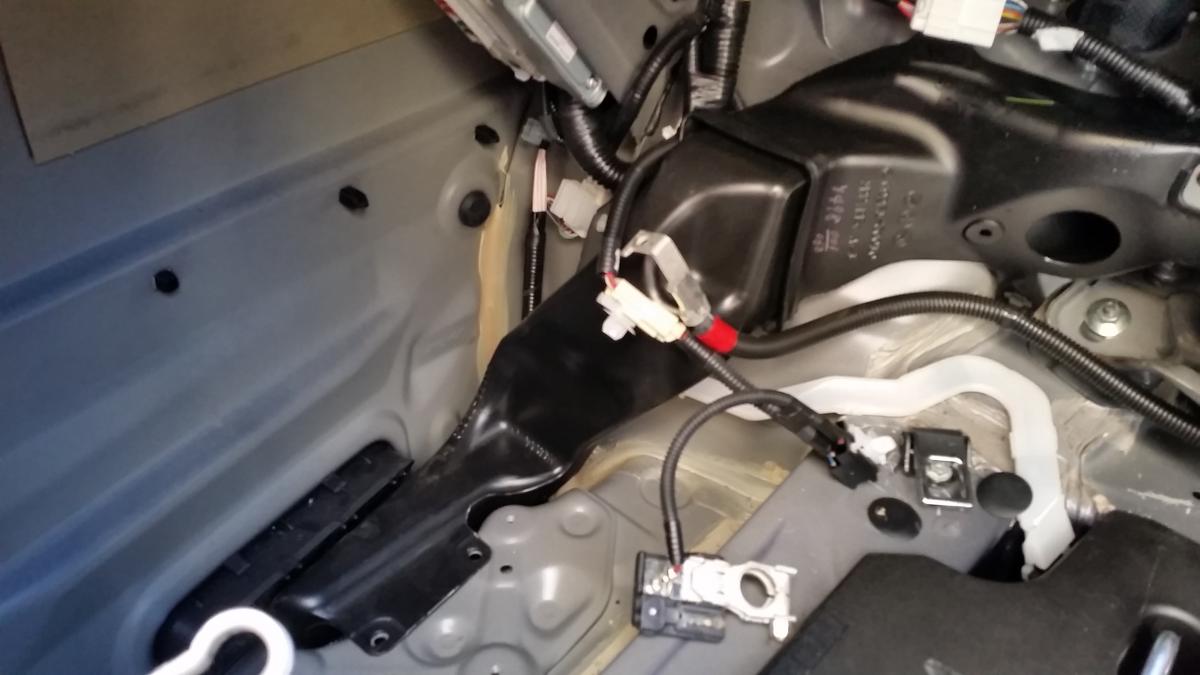
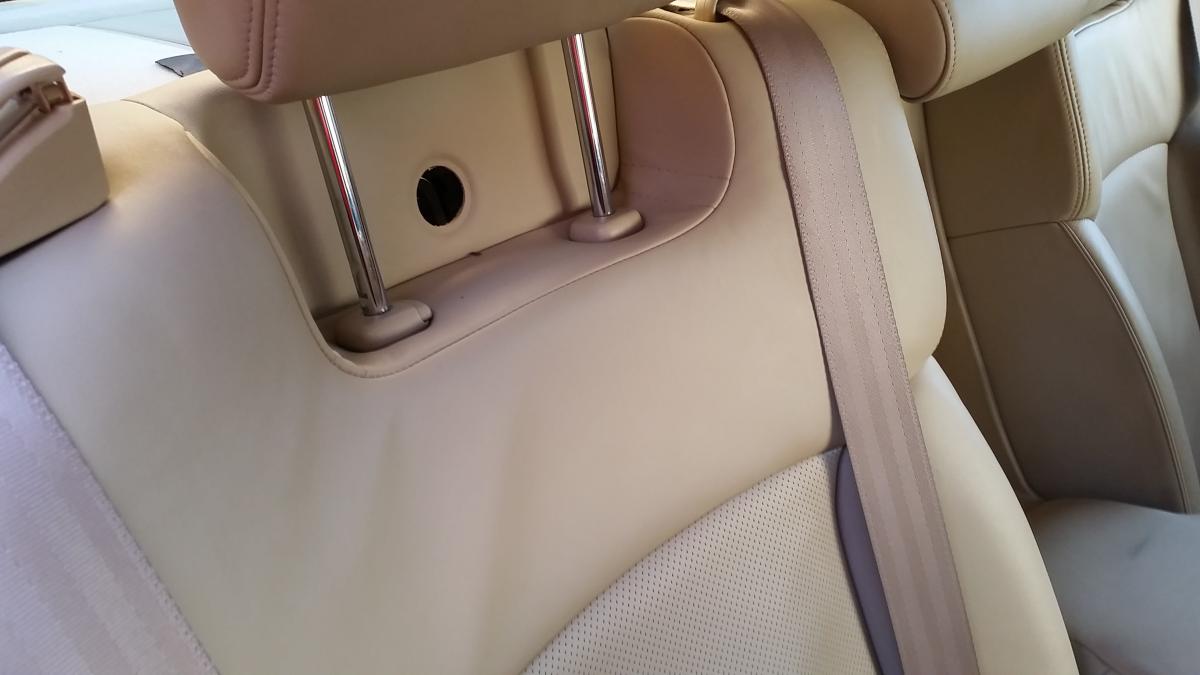
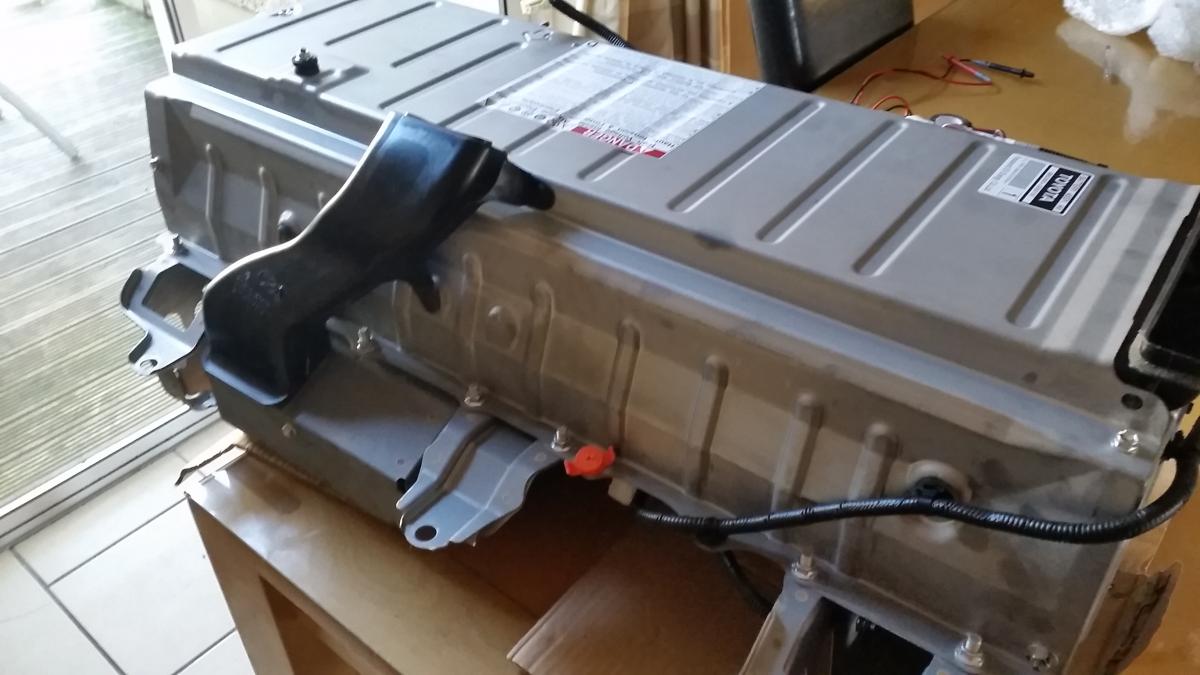
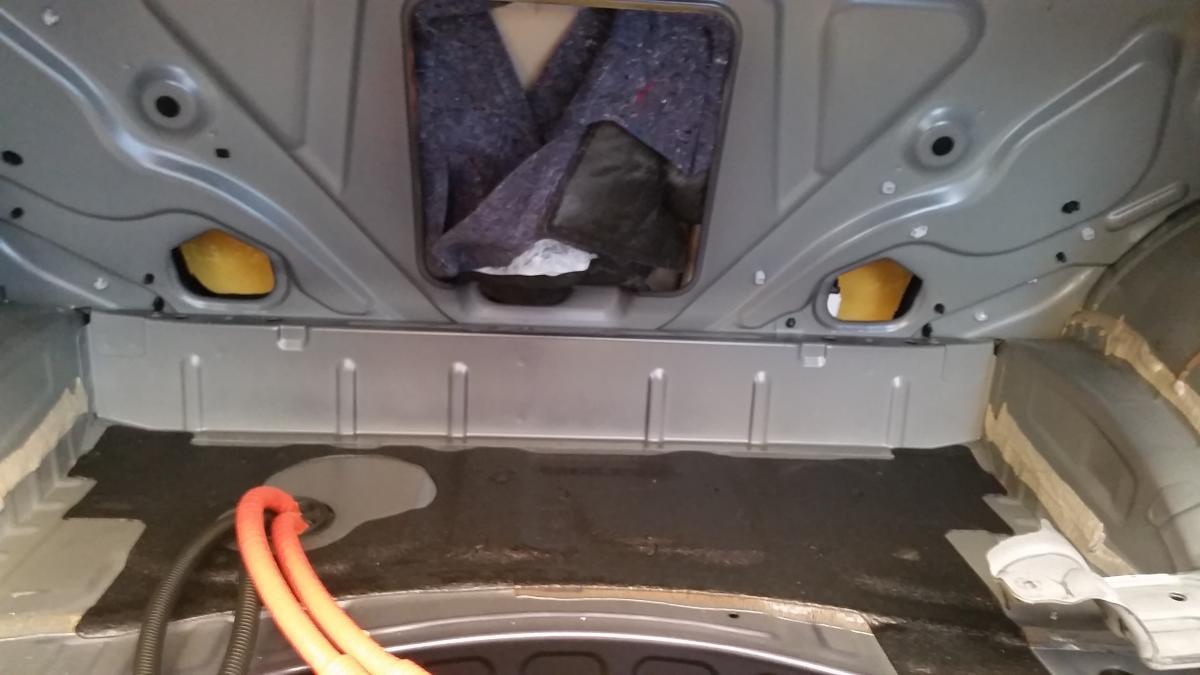
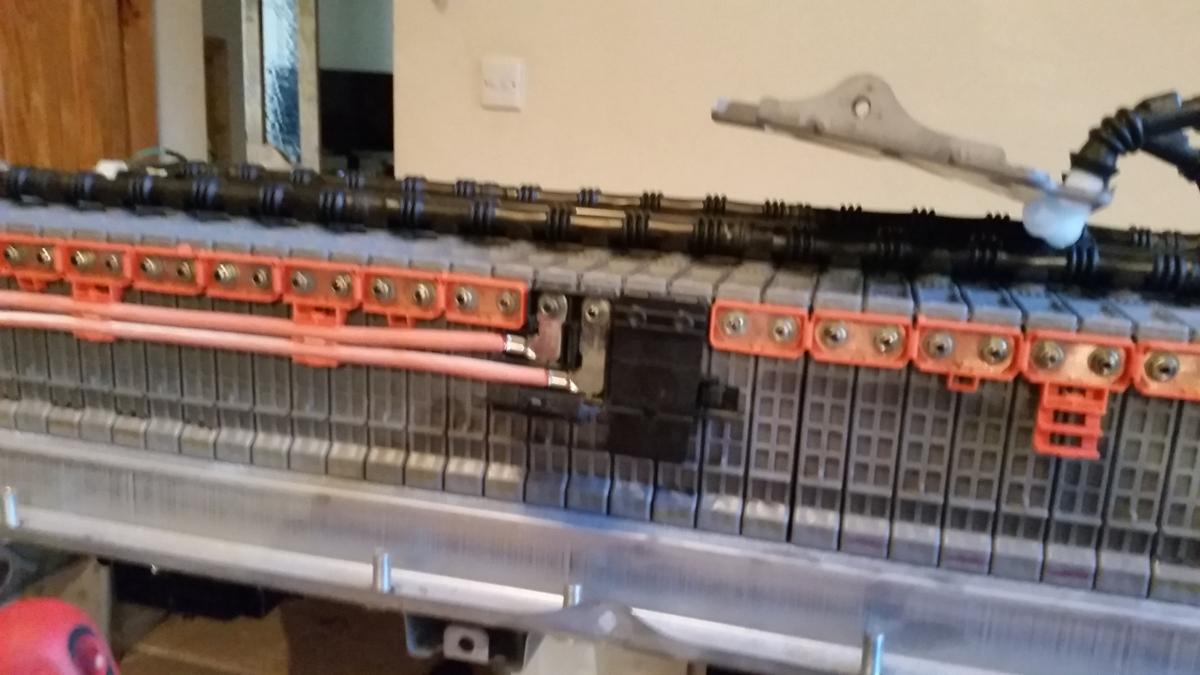
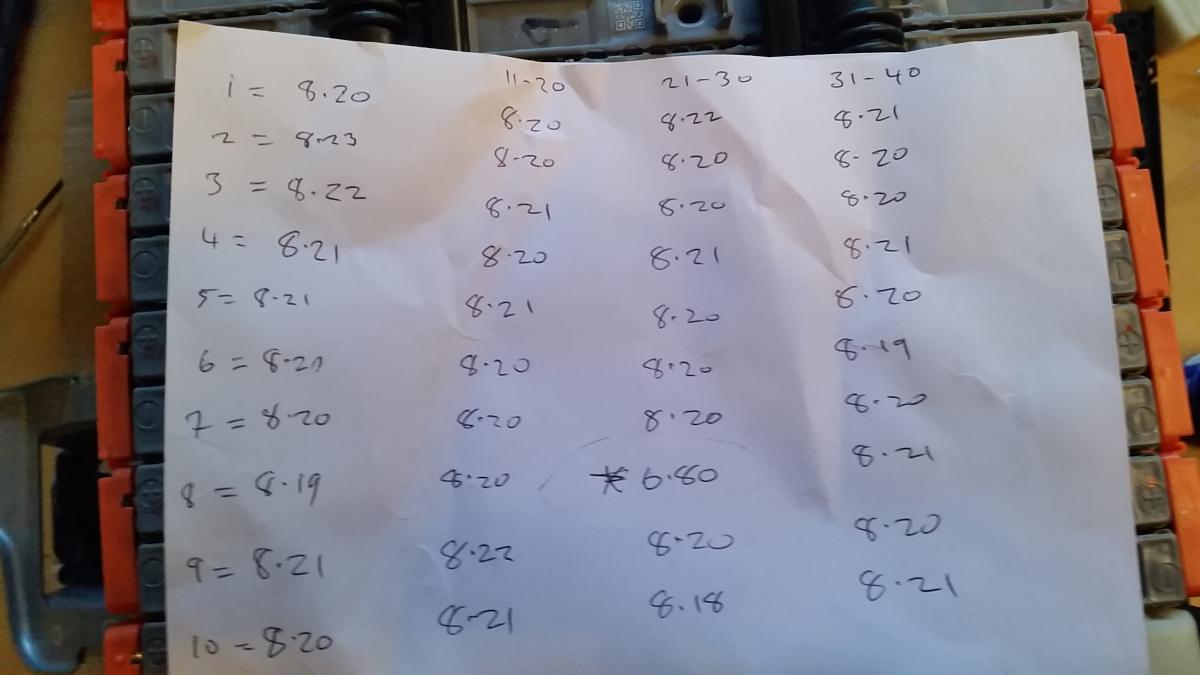
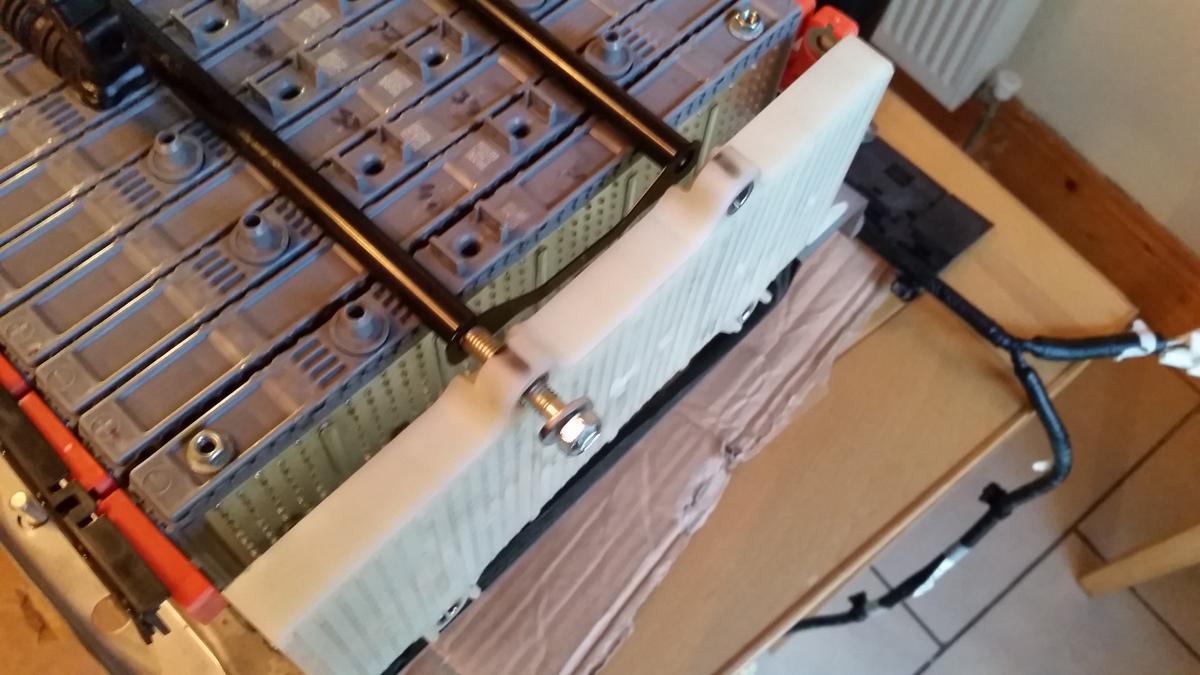
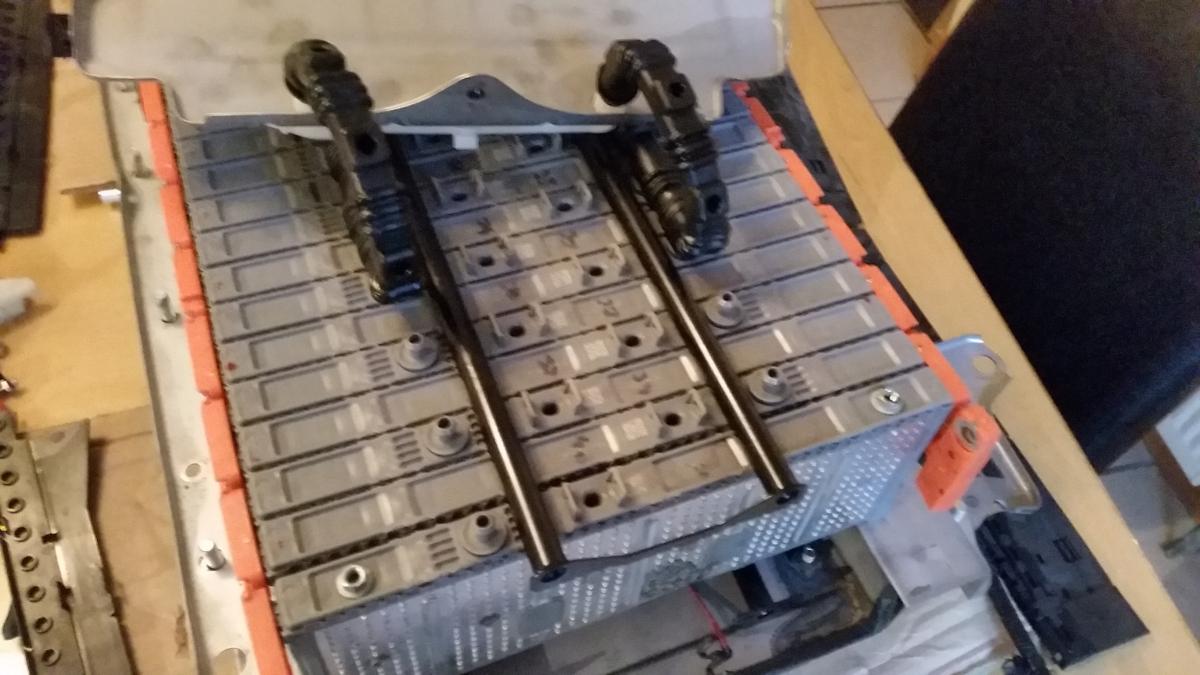
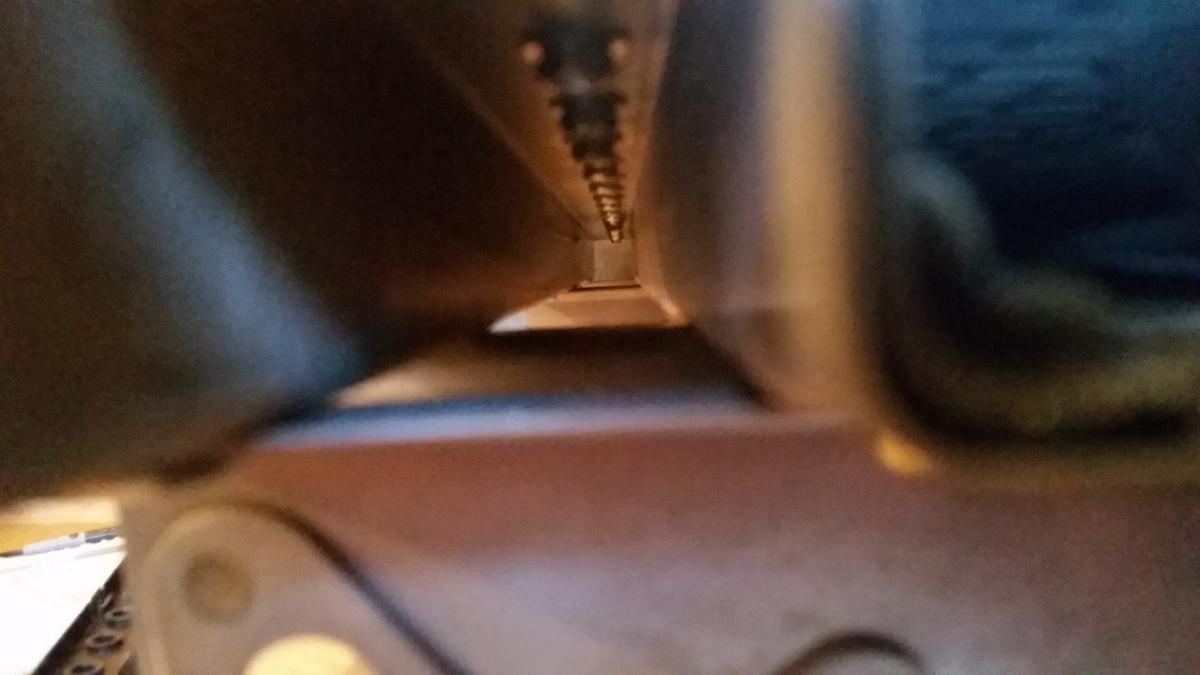
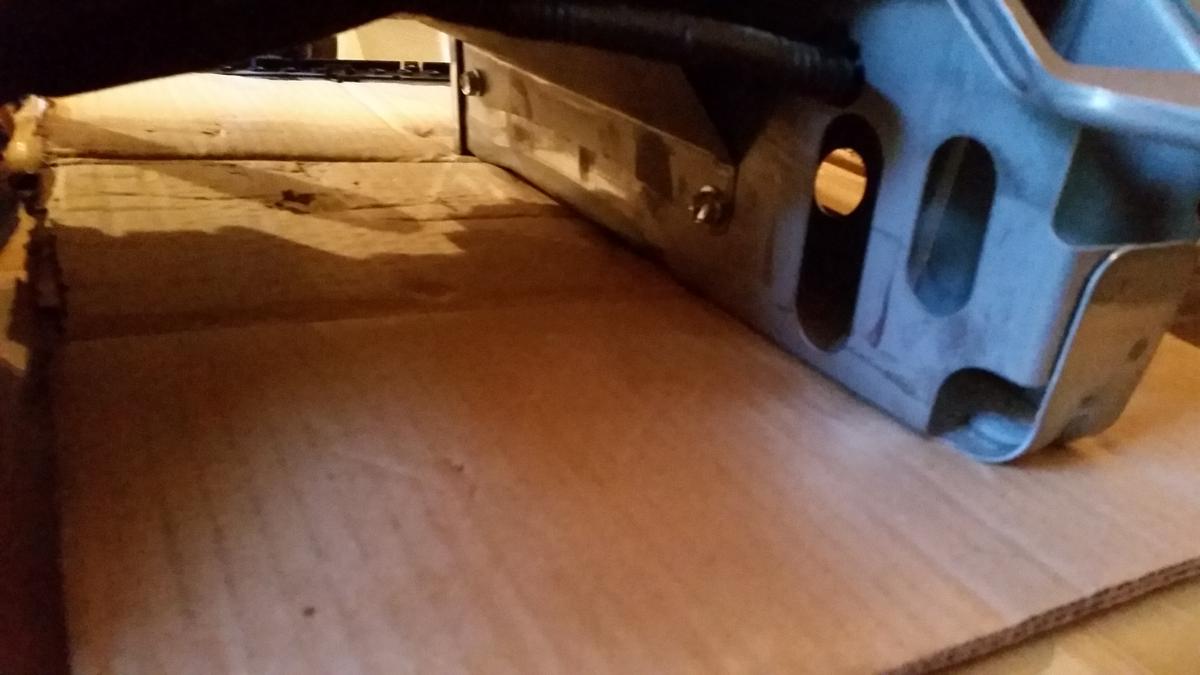
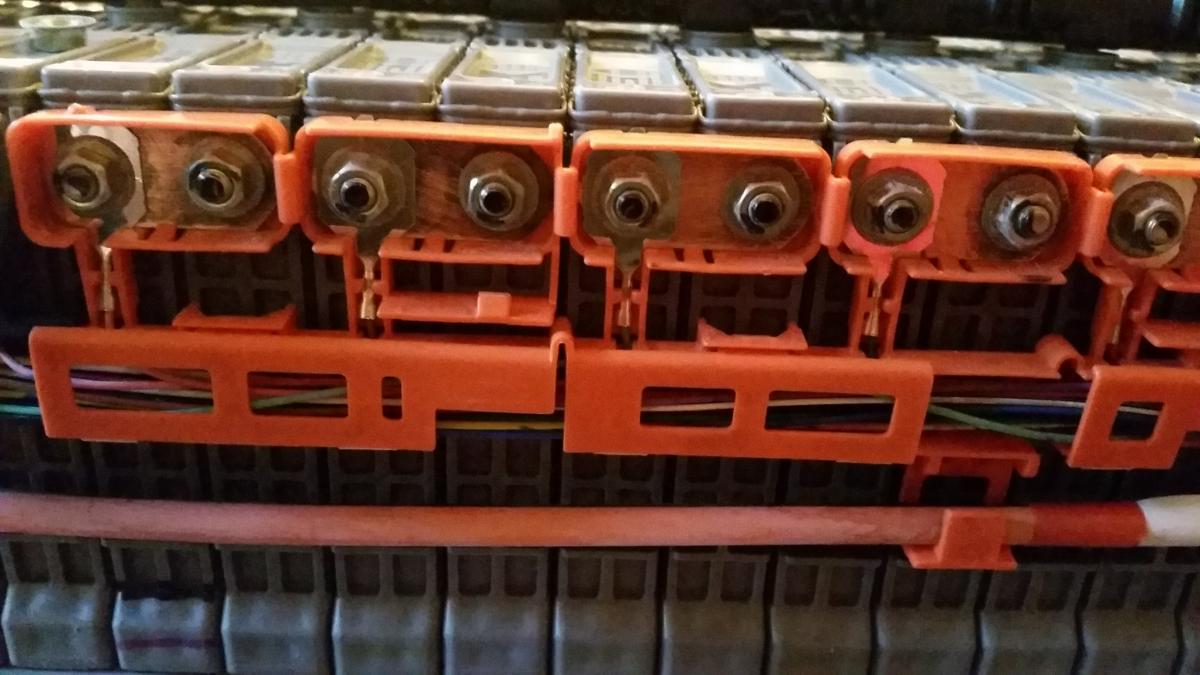
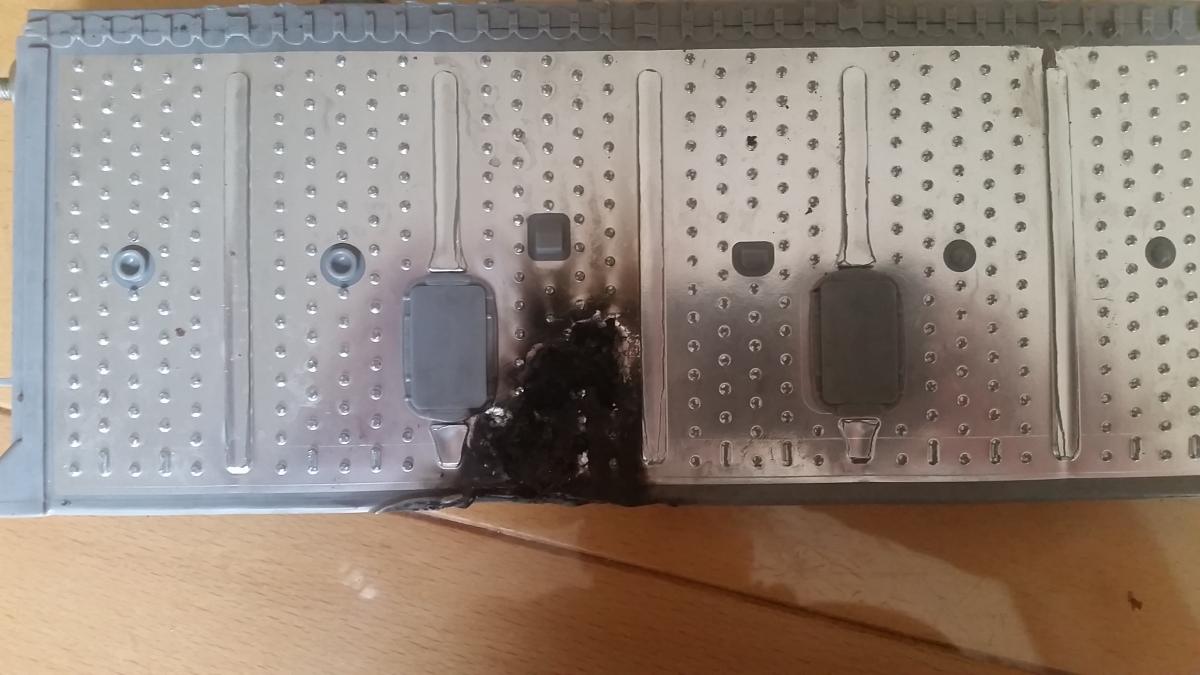
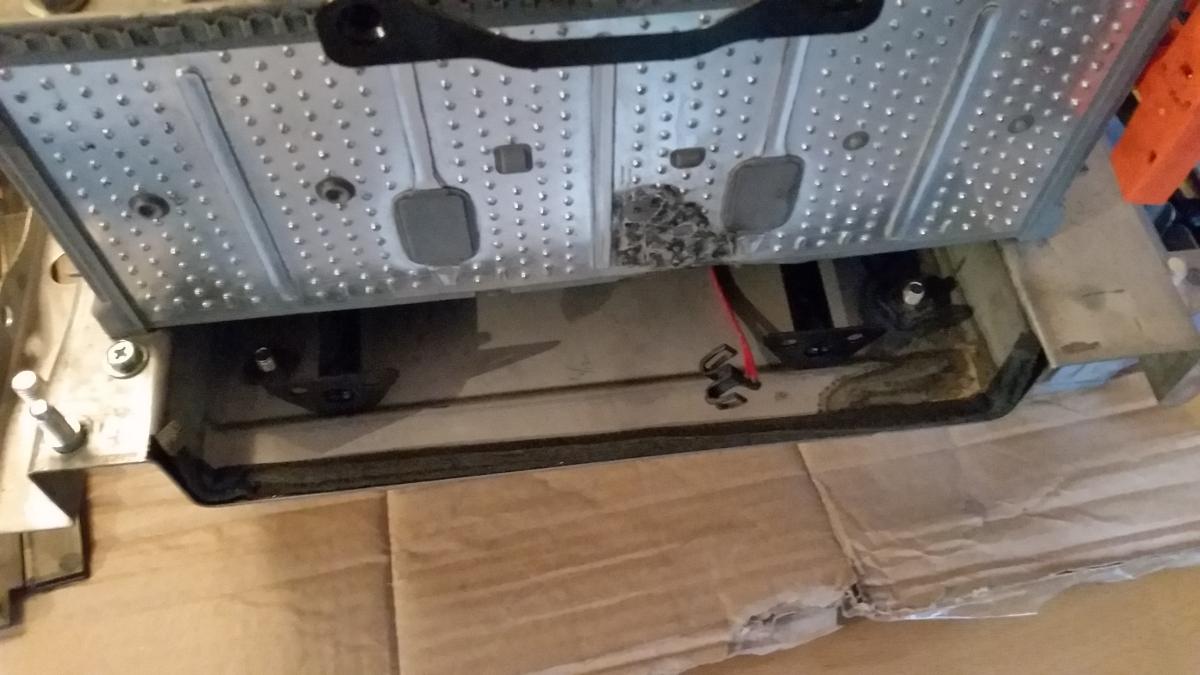
I got the dreaded Check Hybrid, Check VSC and Check EBC warning lights. Fault code readings P0A80 Hybrid and P3017 (battery cell block number 7 fault). Having gotten a quote for around €6000 to fix it, I decided to do it myself. I ordered a battery cell on ebay for €45.00 delivered to Ireland. Tools needed: Socket set with 8mm, 10mm and 12mm. Flat head screwdriver, long nose pliers and a multi meter to read voltage. (You may also need a slow trickle 12v battery charger, I'll explain later). Time needed: about 4 hours, more if your connections a very dirty. 1: Remove ALL carpeted paneling from the boot (trunk if you're in the US). This is done by inserting the flathead screwdriver into the black plastic rivets and popping them out. Remove the boot flooring too, just leave the tool tray in place. You will need the 10mm socket to remove the rear boot floor luggage anchor points once you've popped open their plastic covers. The upper hanging points need to be squeezed to remove. Disconnect the power supply to the light on the right hand panel. 2: Remove the orange circuit breaker on the HV battery by sliding to the right and then pulling towards you. 3: Remove the black air duct on the bottom of the HV battery by popping the 2 black plastic rivets. 4: Unplug the power supply to the white cooling fan on the upper right of the HV battery and remove the 2 nuts holding on the fan. This should allow the 2 upper black ducting to move sufficiently to be able to remove them. 5: Open the panel covering the 2 Orange Cables (3 x 8mm nuts) and disconnect the 2 orange cables, (you can tape them up with electrical tape if you so wish). Pull back the rubber cover on the Black cable and unbolt that too. You should now look something like this: 6: Disconnect the cable running from the HV battery to the 12v lead battery. Continue to remove the 12v battery by disconnecting the +ive and -ive terminals and the white connector plugs attaching it the the HV battery. Also need to take off the temp sensor and the vent hose on the 12v battery. Remove the 12v battery support bracket and the battery tray itself. 7: Remove the last 2 bits of black ducting that was clamped by the 12v battery tray. 8: Remove the white tubing on the right of the HV battery. 9: Remove the 4 12mm nuts holding the base of the HV battery in place, 2 on each side. 10: You need to unbolt the nuts hidden behind the back seat headrests. 11: Pull the rear seats forward enough to remove the large plastic panel in the center between the rear seats and the boot wall, its hidden behind the fireproofing fabric. Use this panel cover to hold the seats away from the boot wall by wedging it between seats and wall. 12: Pull back the fireproofing to reveal 2 smaller access panels covered by a black sticky rubber square. Now remove the 3 12mm nuts holding the HV battery to the boot wall. 13: Now the tricky bit, lift the HV battery over the bolts in the boot and slide it out. (I recommend putting cardboard on the tool tray to avoid scratching when sliding the HV battery). If you are strong enough you can lift the HV battery out on your own, if not get help, it weighs about 50 kilos. Your boot should now look like this with the access panels behind the seats visible: You should also have this, I placed mine on some cardboard on my kitchen table: 14: Take off the HV battery cover by opening all the 10mm nuts, and a few 8mm. unclip the black cable while taking off the three cover panels. 15: Unclip the black plastic covering on both sides of the HV battery to reveal the 8mm connector nuts in the orange casing. 16: Number the cells 1 to 40 using a permanent marker. Use your multi meter to get a reading across each of the 40 individual cells, i.e. one lead on the +ive terminal of the cell and the other on the -ive, and record your findings, as you can see cell 28 was low for me: 17: Pull back the rubber vent tubing running along the top of the HV battery until to get beyond your bad cell/cells. 18: Remove the white end panel holding the cells in place: 19: Remove the 80 x 8mm nuts in the orange casing and clean if necessary. I used bleach and some sand paper to clean all nuts a copper plates, if you're gonna do it - do it right). 20: Remove the 8mm nuts holding each cell in place underneath until you reach your bad cell (this will probably involve removing the support leg and the converter assembly unit below the HV battery: 21: Good cells look like this Bad ones like this: 22: Start replacing your cells back into the HV battery, it doesn't matter what order and you can't mess up polarity as it only screws in on one side. I put my new cell in last in case it was a dud. (If your new cell is of a lower or higher voltage use a slow trickle 12v battery charger to get it to the same voltage as the other cells. 23: WATCH THE TEMP SENSORS UNDER THE BATTERY CELLS (3 of them), MAKE SURE YOU CLIP THEM ON AS YOU GO. See the black plastic clip peeping out here: 24: That's it you're done, just reverse everything to put in back in. Mind your back and don't bother touching cell 1 and 40 at the same time if you have the orange connector put back on. Good Luck!
 1 point
 -
I've owned a number of large cars all of which were supplied with some form of scissor jack for road side wheel changes. I've never been happy using a scissor jack due to the weight it has to deal with. Once more I have adapted my bespoke jacking plates which I made 4 cars ago. These are bolted directly to the car's sill flanges where a technician would swing the arms under of a two poster lift. Every large car I have owned has had sill flanges which were buckled and bent over due to the weight concentrated over such a small surface area. Most sill flanges are approx. 4mm thick and yet all the weight of the car is suspended across a surface area of 4mm X 100mm - 150mm of the lifts lifting pads. Even slightly misaligned can cause the distortion I am talking about. Hence the use of this guaranteed method of zero damage to sill flanges. I have just bought this car and spent a few hours repairing my own buckled sill flanges, de rusting, treating with rust inhibitor and then a top coat of Hammerite. The round jacking plates now sit 15mm lower than the plastic sill covers in all 4 corners. Going forward when I have to have the car serviced etc the dealer will be told to jack my car up only using these high strength steel fittings. Having just removed the plastic sill covers and had them re painted there will be absolutely no excuse for any Technician to damage my car's bodywork or sill flanges. I use a standard trolley jack at home for wheel removal etc but carry a mini trolley jack in it's own carry case in the boot for any road side wheel swops. Obviously where a garage use a drive on drive off lift then there is no need to use the jacking plates. Pics attached. Steve
1 point
-
Cheer's for the replies. I'm after sound and a less restrictive exhaust as i'm slowly sourcing the parts to supercharge my IS. I started to flirt with the idea of getting a second manifold and sliding a bit of pipe through the cat to create a decat pipe. I guess i could chuck it in for a free emissions test just to see how bad it would fail the mot. This was the back pressure should still remain as the pipe would go from a 2" to 1.5" back to 2" after the cat. I'll give this a try first and report back with the emissions test showing if it passed/failed and how good/bad it was. Just the manifold from a breakers is pretty cheap anyway. Thanks again for the replies guy's fingers crossed on the emissions.1 point
-
55p a litre plus attended service eh Mike, can't be bad, "I tried to do it myself but the nozzle won't fit" :)1 point
-
Initial impressions of the new coilovers is good. Still firm enough to throw around the twisty bits, but softer over speed bumps, bad road surfaces, drain covers etc. The USRS bushes from RR-Racing are really good! Think they have stiffened up the ride a bit over the soft OEM items, but my softer springs on the BC BR coilovers cancel that out. The front is now nicely gapped between the tire and the wheel arches, but does catch if you try using full lock on the steering. :( Not much I can do about that other than raise it a bit more. Will see how it goes, as very rare for me to need full lock (was trying to parallel park when it caught the plastic arch liner). I'll update again once I've got a few more miles under my belt, but I'm pleased with what I've found so far. :)1 point
-
HOW? Changing cambelt doesn't involve the Gas! If the work done improperly, the car would react the same with petrol or gas....after all, petrol IS gas at ignition. Gas+Go in Swindon are a bit far from you, but there must be others who'll do the belt.1 point
-
Mike to the rescue-again!1 point
-
Cataclean: Used it on a 14 year old 1.0 Yaris where the cat was failing. (read fault codes) .Worked for 20 miles - the warning light went out. Then I discovered the cat had a hole in it and needed a new one anyway.. Then the warning light came on again - same fault code. So my view is: if you have a cat fault, and the cat is old, it's likely to be b*****ed - so save your money and buy a new cat.1 point
-
http://www.autotrader.co.uk/classified/advert/201510147790011?onesearchad=used%2Cnearlynew%2Cnew&postcode=lu11tx&page=1&price-from=1500&model=is_200&radius=1501&sort=pricedesc&make=lexus&search-target=usedcars&price-to=2000&logcode=p1 point
-
took car in monday to lexus nottingham for full service the staff were great ,everything on car running spot on. with gold membership got discount of around £80 so was really happy at £368. since i have been a gold member from june including the discount at halfords i have saved well over £100 membership is such good value.1 point
-
Yes Lexus Hatfield offer Gold Members 10% discount off labour, parts and servicing M1 point
-
http://www.ebay.co.uk/itm/Car-Van-Tyre-Tire-Puncture-Repair-Kit-With-5-Strips-New-High-Quality-Tools-/351418788513?hash=item51d2312aa1 i have used this type of repair in our hybrid jazz and it has worked really well,i repaired the tyre using this kit approximately 2 months ago and the tyre hasn't lost any air. it takes about 5 minutes to complete the repair all you need is a compressor / pump to re inflate the tyre. the other benefit is that it takes up next to no space so you still have your under storage.1 point
-
Took my car to Lexus, Cardiff today. Seven year/70k annual service and mot. I have the Lexus extended warranty in place to Jan 2017 so I have to service at Lexus to satisfy the conditions. I know that some on here would say that a seven year old vehicle should go to an independent instead of Lexus to save costs. All went swimmingly with an mot pass and only minor things highlighted in the service. My car was valeted to a very high standard with even a couple of scuffs to the alloys touched in and tyre black applied.....she looked a treat ! The staff I encountered treated me exceptionally well and I was particularly impressed with Natalie on the service desk. Did this cost me a fortune ? No......£299.85 including mot......not much more than an independent would charge ! In return, I have a shining car, mot and Lexus service stamp with no greasy finger marks from the independent guy.1 point
-
I hate tyre repair kits! Not that I've had course to use one.. that's tempting fate! I've heard so many stories about them, they're good for a quick repair to an ordinary puncture in middle of the tread, but what happens when you damage the outer part of the tyre or get a cut in the tyre wall - useless! Also rumour has it here in the UK a lot of repair firms are loath to clean out the tyre before making the repair so force you into a new tyre - fine if the tread is well worn but then you effectively have double the cost. Also the TRK's have a shelf life so if you're intending to keep the car for a while you may have the extra cost even if you haven't used the kit. I've gone down the route of purchasing a space saver on my last two cars, just for the 'peace of mind'. The down side being that many vehicles don't have a wheel well for storage so boot space is lost. Yes it would be good to hear other members thoughts and experiences on this.1 point
-
I cannot imagine why Lexus do not recommend changing the Diff oil. There has been some talk on various forums about changing the Transmission fluid but that's another matter. I recently changed the Diff oil on my GS 300. There are some notes in the owners manual about what grade to use, references to a sticker on the diff, etc. Mine didn't have that. I used 2 Litres Fuchs TITAN SINTOPOID SAE 75W-90 Synthetic Gear Oil, it was about £24. I used new seals / washers that cost a couple of quid from Snows Motor Group. If you are doing the job yourself, it's just possible to get under the car to the Diff if you can raise the rear by a couple of inches. My garage floor is slightly lower than the drive so I just parked the car with the rear wheels on the drive and as the floor is lower I could squeeze in without any jacking / axle stands. Make sure you release the full plug before draining and you will need bottles with those pointy ends on or a syringe to put the new oil in. It takes about 1.4 litres but get 2 to allow for spillage etc.1 point
-
Hi guys, First off, please move this topic if its in the wrong section. I've never been to a dealer for servicing before as all my previous cars go to specialists. I thought I'd take it to dealer this time round as I wanted the visual check docs to ensure the car is in good health. Turns out it is with a few minor issues such as low rear brake pads and 'seized caliper' which I'll fixed/replace later. The overall experience was excellent, got a courtesy car for free that morning, went shopping with the wife for a few hours, they chucked in the pollen filter for free also. Yes it will cost less elsewhere (I got 10% discount for being a gold member) but these days I cant be bothered to crawl under a car, I would rather sit in front of the telly with my feet up but any small stuff like brakes I will do myself. So thought I share my experience with you, the pregnant wife says the toilets were really clean :)1 point
-
Pictures? Okay. Here's the front and back, as bought. Wheels are my biggest gripe but I may go for a respray after I've T-cut and polished the whole body. We'll see.
1 point
-
I cant see on the service schedule that the gearbox fluid ever gets changed - there is a note to check for signs of transmission leakage along with an inspection of the rear diff fluid at 80k miles Are there any benefits in changing the auto box fluid - car is coming up to 90k and a lot of short miles are done so the box does work hard and I am thinking it would benefit from an oil change. I have looked through the forum for anyone that's done this but cant find any mention - has anyone actually done it? Any pictures available as to where the drain plug is located (if it has one?) and how easy it would it be to do this or is it recommended to have Lexus or a good garage do it? Also, does the box have a filter installed inside its pan?1 point
-
You need original discs and pads from dealers. They cost £150 for discs and £80 for pads. This will sort your problem. Do not use any other manufacturer as you get the shimmy no matter which brand you use. Unfortunately you will have to fork out the cost. Trust me I had exactly same problem for about 18 months.1 point
-
Cambridge Lexus are my local dealer... I go to Lookers in Hatfield. I went to Cambridge Lexus to look at an ex demo which they wanted top dollar and minimal P/ex. The sales man spouted a few inaccuracies which erred on the side of the dealer and made us feel like unwelcome tyre kicking wastes of time. I bought my car from Tunbridge Lexus. they were far more genuine, knew their product as did HatfieldLexus however Hatfield only had a blue one whilst Tunbridge had the white ex demo i wanted.1 point
-
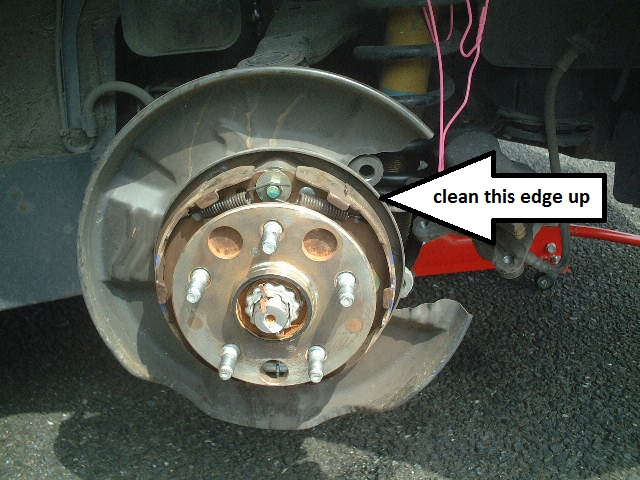
The offending lip is shown in the picture below - just use a dremil drill to clean the lip up and also the insert in the disc that this locates into. You will see what I mean when you take it off as there will be a lot of rust and dirt also collects there. I actually ground a bit off the dust shield and the noise did not return. It may be something else but this was what resolved it for myself and a few others with the same issue. picture below
1 point
-
It is really easy to knock the wheel studs out And then just hit it with a wire wheel until you can see your face in the hub Now I have put it all back together with new pads and discs and it drives like a brand new car No knocks and no bumps at all1 point
-
Hello All, Just wanted to drop in and say hello. I am a big BMW forum poster (M5Board.com) and contributor to Pistonheads, but also have a P plate LS 400 Series 3 Aspen Green with matching leather interior. The car is totally standard other than an aftermarket Xenon (HID) lighting kit which makes night time driving so much more relaxing. The car has 102,000 on the clock, one previous owner and it runs beautifully. Somewhat less expensive to keep than my BMW M5 but is a different sort of car. Anyway I will be posting the odd question on here but just wanted to say hi. Am based in Hertfordshire and have my car looked after by both Lexus Hatfield (Lookers PLC) and Japex in Kings Langley (Herts).1 point