Leaderboard


Popular Content
Showing content with the highest reputation on 06/16/2014 in all areas
-
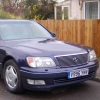
So my 186000 miles LS400 MK3 went for mot tother day and failed :-( on ...... One headlight aim :-) a minute to adjust and alls good again.What A CAR :D2 points
-
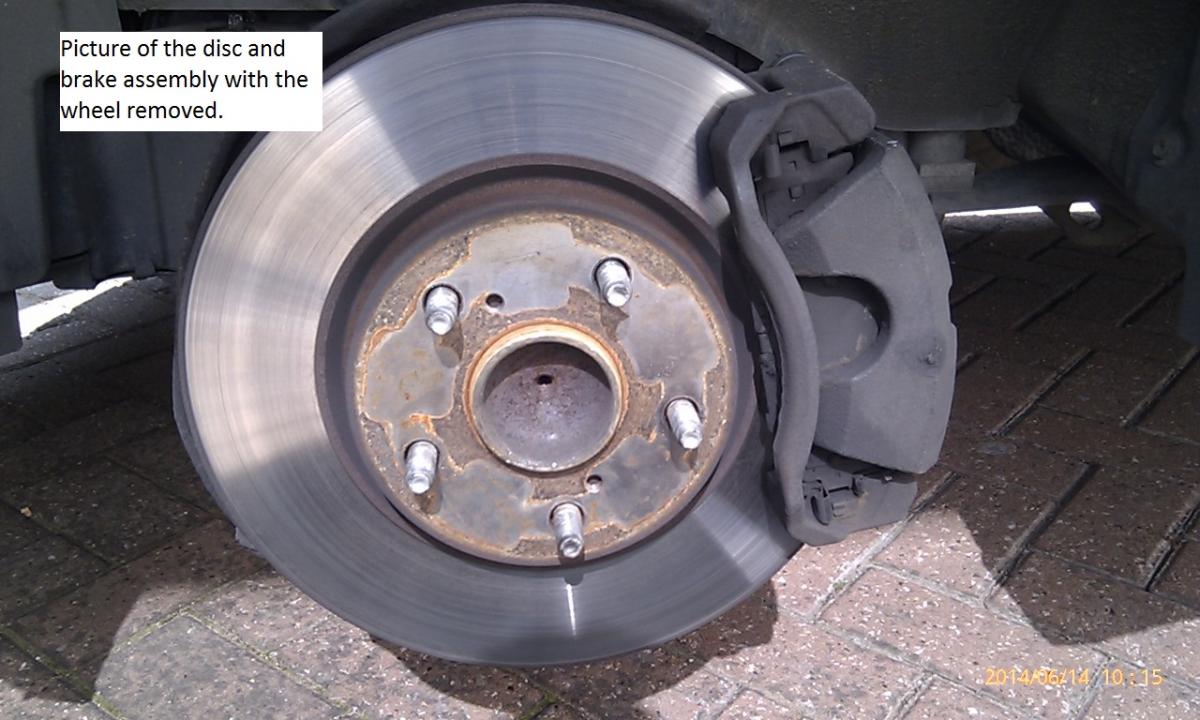
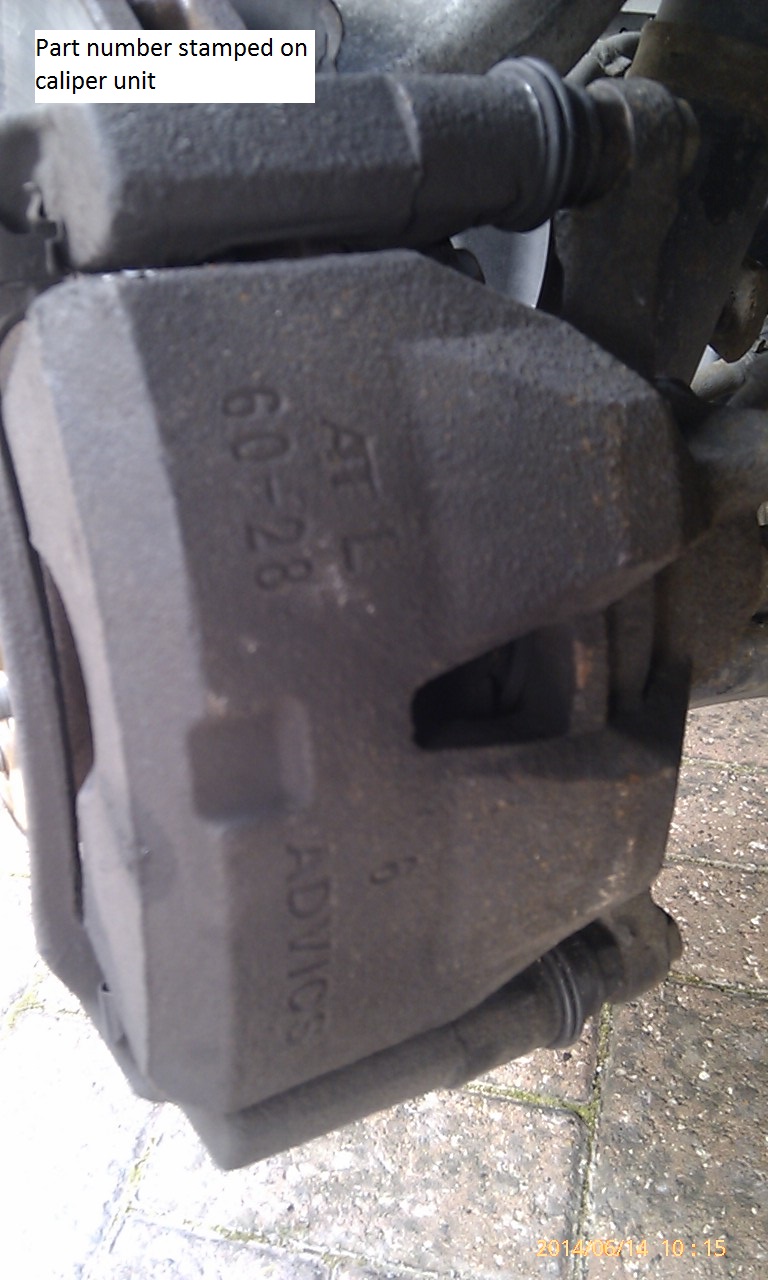
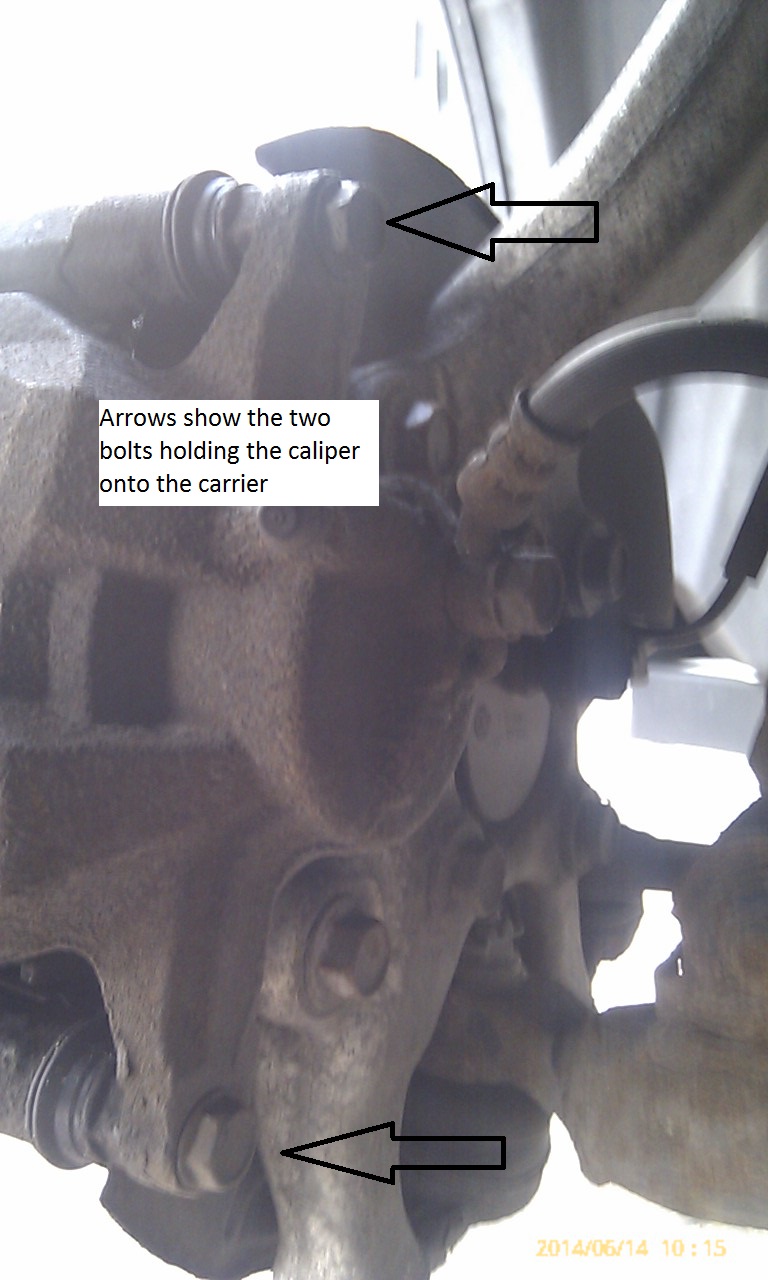
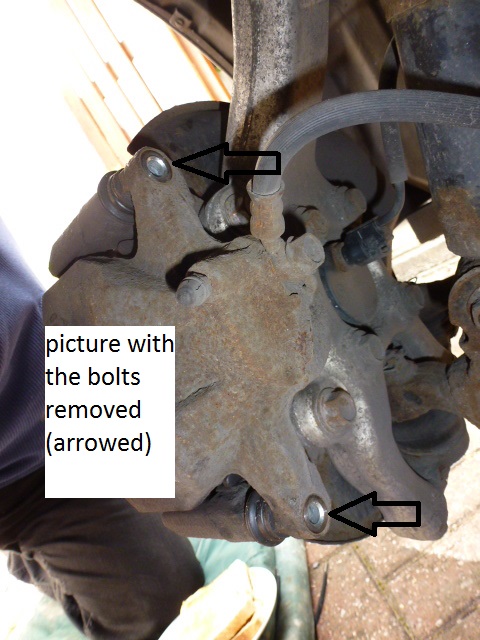
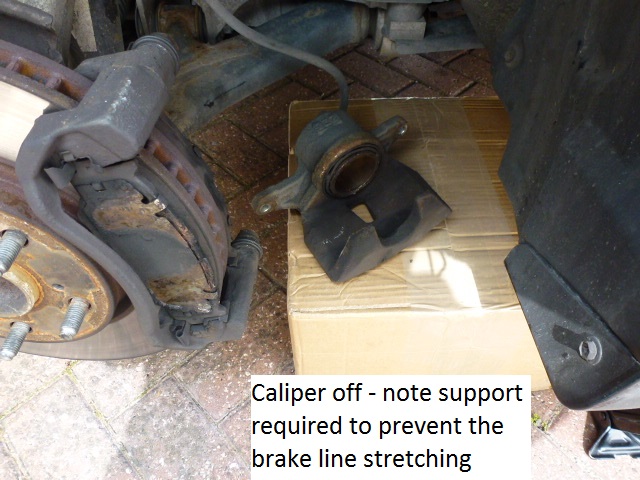
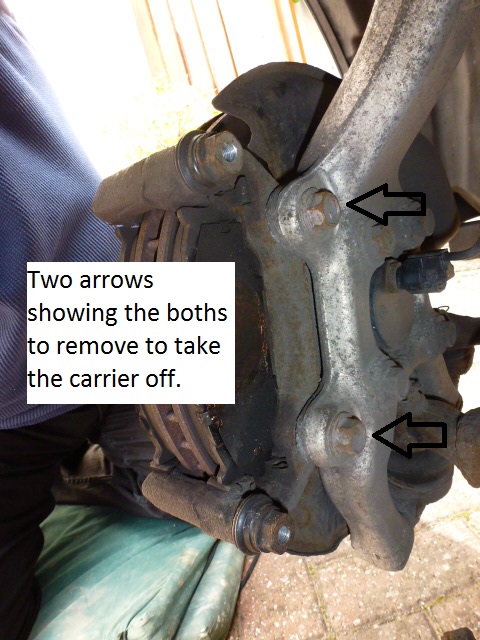
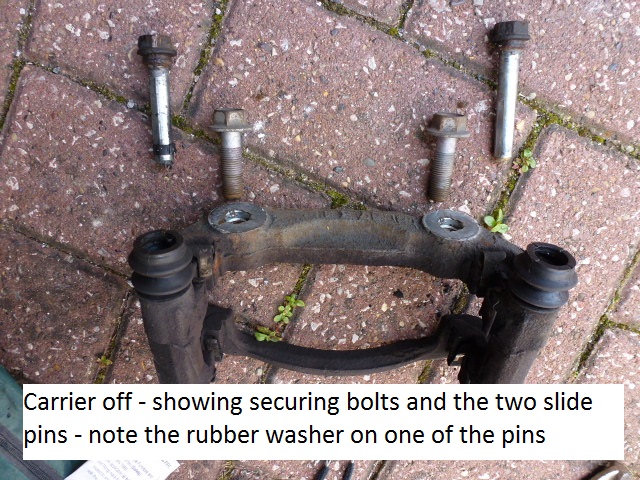
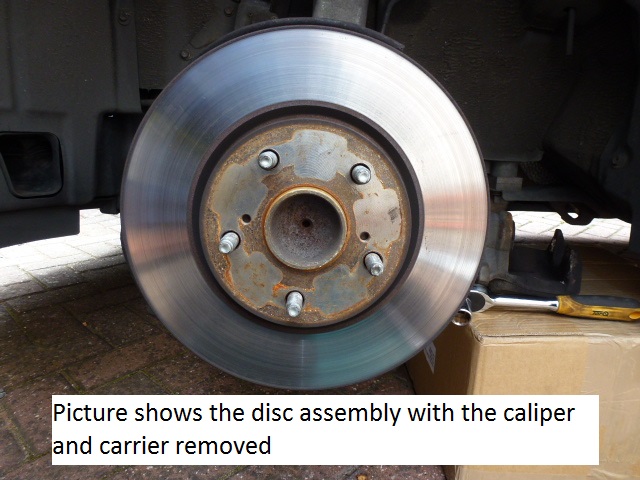
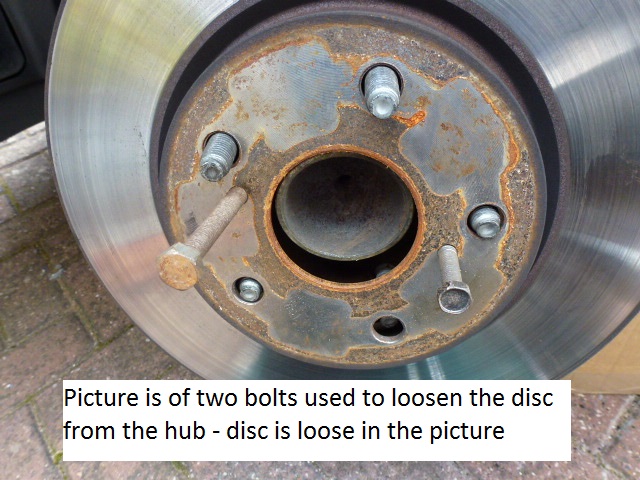
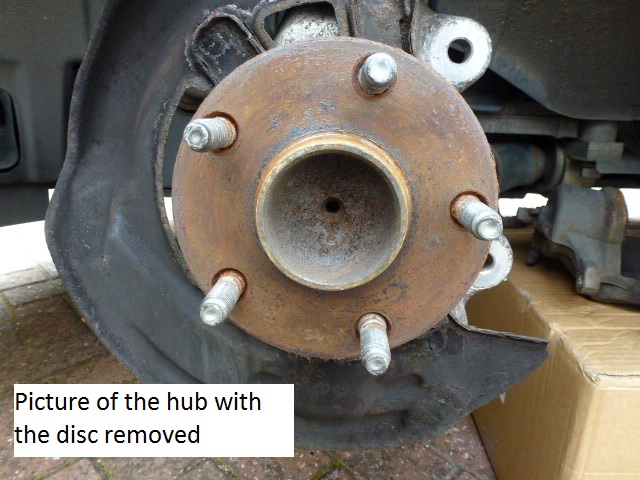
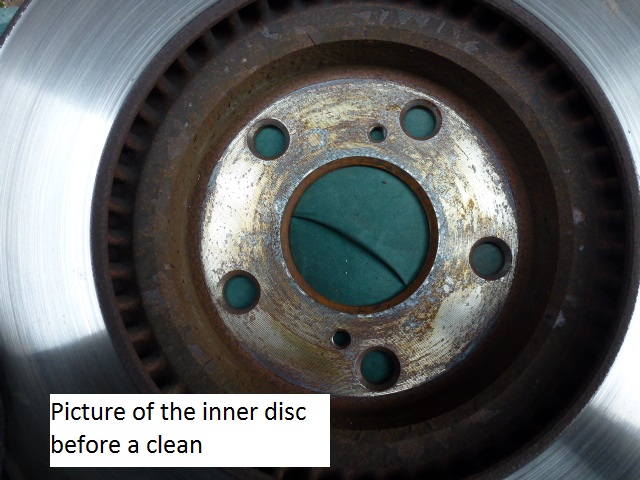
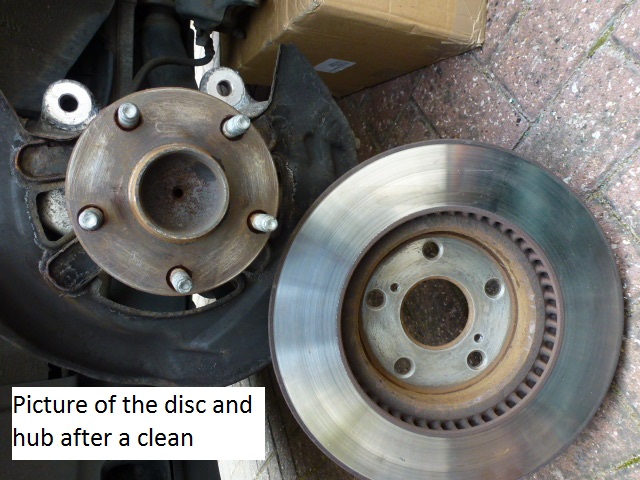
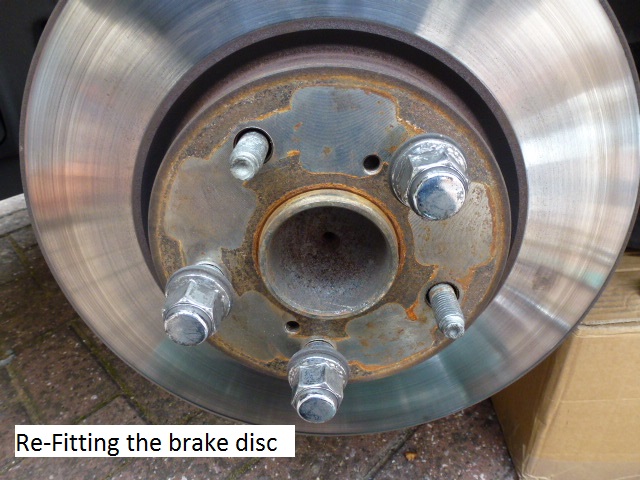
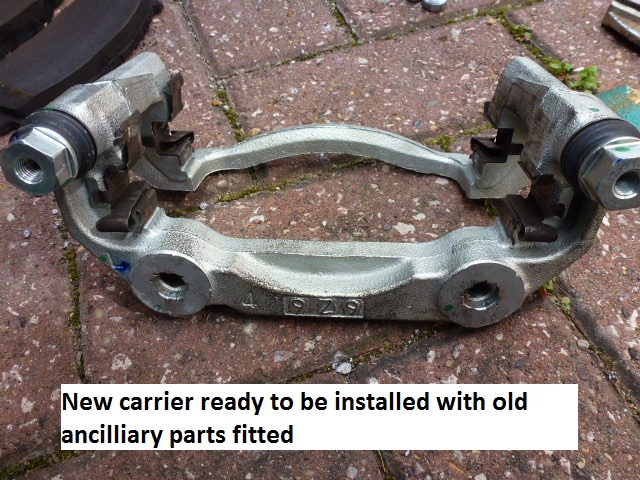
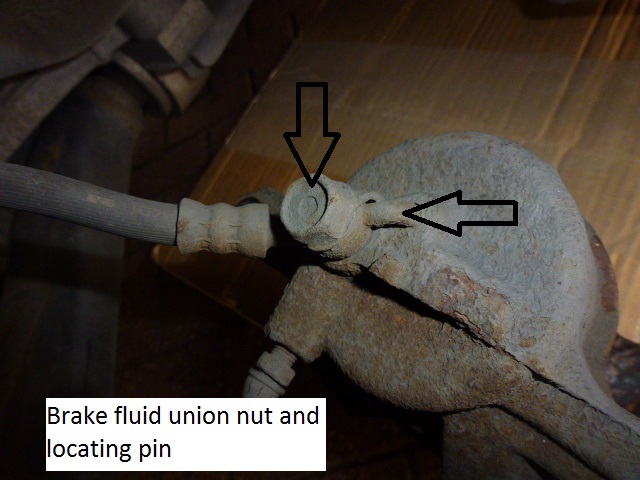
My recent MOT highlighted a brake imbalance on the front brakes. I since greased the pins which were sticky but noticed the rubber boot seal around the piston on the calliper had a big hole in it so rather than mess about with a brake seal kit I replaced the full calliper unit. The process of removing the calliper assembly and disc is below... Obviously make this safe as possible - chock the wheels before starting etc... I DONT KNOW WHY BUT THE PICTURES ATTACHED HAVE COME OUT AS THUMBNAILS WITH THE FULL PICTURES AT THE END OF THIS POST BUT CLICKING ON THE PICTURES ENLARGES THEM 1/ Remove the wheel - I tend to remove the security nut first as if left to last there is a lot of pressure on it and you could ruin the locking key or the nut itself making it hard to get off. Picture below is of the brake wheel assembly with wheel removed. 2/ Probably should have mentioned this first but the part number is stamped on the calliper unit as shown in the picture below... 3/ The picture below shows the two bolts you need to take out to remove the calliper assembly from the carrier - you will need a size 14 socket to do this. Store these in a safe place as if they are lost its a full calliper replacement. 4/ The picture below is of the calliper assembly with the two securing bolts removed - the calliper can now easily be pulled from the assembly. 5/ The picture below is of the calliper - removed from the assembly and placed on some form of support (plant pot / brick etc - something with enough height to stop the brake hose from stretching) I have used a box, as in the picture. 6/ The next picture is of the two bolts that need to be removed in order to take the carrier out. Remove the brake pads first and clean up the shims, remembering to add new copper grease to the pads to stop them squealing. Use a size 17 socket to remove the bolts on the assembly to remove it. 7/ With the carrier now off, you can remove the slide pins - (you can remove them with the carrier secured to the brake assembly) its up to you how / when at what point you remove them. Note the rubber washer on the top slide pin - I had read that this prevents brake rattle but a lot of the IS 200 owners when greasing the pins take this off. The rubber washer tends to only last a few cleans, the rubber tends to stretch and this is part of the cause of a sticking calliper as it creates a hell of a vacuum in the slide pin "tube" and stops working efficiently. Removal of this has no effect to the operation. I have purchased these in the past and i think? they were around £12 each..! Its a good idea now to clean up the pins at this point - they should be shiny and you can safely clean these up with a wire brush. Also if re-using them, check the rubber boot on the carrier secures itself quite tightly around the recess in the pin. You will find the boot stretches also and in time it just is not tight enough to hold onto the pin and as a result of this it lets dirt and water into the slide pin tube. 8/ The picture below is of the disc with the calliper assembly removed. Check the disc for grooving and rust. I had changed mine a while ago so i know this one is fine. 9/ Using two bolts (i don't know the size), shown in the picture, screw these in to remove the disc from the hub. The picture shows the disc loose from the hub. 10/ The picture below shows the hub before a clean. It is important that the face of the hub is spotless - no rust / dirt etc as this can stop the disc from mating cleanly and will cause brake judder. Clean it with sandpaper / wire brush and clean afterwards - i use an IPA solution but any cleaning solution will do. 11/ The picture below is of the inner face of the disc - again, as above, its important to get this clean. Clean as above for the hub. 12/ The picture below is of both faces cleaned 13/ Re-Installing the disc - use 3 of the wheel nuts to tighten the disc to the hub. Secure as you would when tightening your wheel (tightening opposites) When you think its tightened spin the disc - it should travel straight - if there's a "wobble" in the spin then take off and see if you have cleaned it properly or tightened it correctly. 14/ Picture shows the carrier unit with the installed old ancillaries from the old carrier - these only need putting on the new unit if it does not have them. They are only held on with two tabs and just ease off with a small flathead screwdriver and are pushed onto the new unit. They guide the brake pads into the unit. 15/ Install the carrier back onto the assembly - a size 17 socket is required, (same as for removal). Open the fluid reservoir in the engine bay. Next locate the brake hose union on the calliper and remove from the old one (size 14 socket) and place onto the new one. Unscrew the union bolt - In doing this there will be a few drops of brake fluid and if you are quick in swapping them over there will be minimal fluid loss. It will not spray out as its not under pressure. The picture shows the union in the new calliper. There is a locating pin attached to the union bolt which makes re-insertion fool proof?! Picture shows the old bolt and the locating pin and the union installed into the new calliper. 16/ After changing the union over wipe away any excess fluid and re-install the calliper onto the assembly - you will need to re-install the brake pads before doing this (remember to add the copper grease between the shims before putting the pads back in the assembly) You will now have the calliper fully installed. Next job will be to bleed the brakes and you will need two people to do this - one pumping the brake pedal and the other undoing and tightening the bleed nipple. You will find that there is not a lot of fluid required as you will only be filling up the calliper piston reservoir and the few drops that would have been lost. Bleed it until no more air comes out. Once happy (brake pedal should be hard - it will soften a bit when the cars started - put the wheel back on and take it for a short run to see if there are any issues. When back from the run check for any leaks (leaks should have been evident at the bleeding process) Enjoy your new brakes.
 1 point
 -
Usually im quite crap at taking pics at night, had a play tonight and came out reasonably good1 point
-
Apparently this engine was a static display piece for Toyota in Norway and although fully functional was never fitted into an LS400. Not very often you see one in this condition so I thought I would post it up.
1 point
-
Never seen topic like this on any other car forum :D1 point
-
ANY car can be clocked. Some cars are more difficult to clock than others. Unfortunately with Lexus- anyone can do it with a laptop, some software and bit of technical knowledge. Clocking odometers is also much more common than many naive people actually think. 20 000 looks and sounds so much better than 80 000; 100K rather than 250K.. I personally think it's a industry wide scam and any kind of odometer alternation should be illegal or heavily regulated by DVLA. Whenever i bought a used car, it's the first thing my friends would ask- what's the mileage :D Who knows? It shows 135K on the clock but how can you be sure, really? What i can be sure about is the FACTS- condition, service history (traceable). I bought it because it's been obviously looked after, not because of the mileage.. I personally would prefer 3 year old car with 200 000 miles (in fair condition and well serviced) to 10 year old with 20 000 miles. Anytime!1 point
-
Mine failed too at 187500 miles on........ Headlight and side light bulb and headlight aim! This time of year I rarely drive in the dark, so I should have checked the lights before the test! What a car...... Mark.1 point
-
Hello and welcome to the LOC. The weather is getting nice now for the SC430s:) Fell free to post up a picture. Working in your county tomorrow at Ingoldmells no roof down in a Transit van though.1 point
-
Hi Andy, as Peter rightly said i got mine from Roheel who got them from a lexus dealership here in UK. Roheel would have more info on where he sourced them from I just paid the price :D1 point
-
Hey Andy. Got mine from Sewells in the States. Sim got his from Roheel, who got them from Lexus in the UK. The guys can tell you the price and part numbers. :)1 point
-
Hi 'VSC Warning' I have a 98 LS400 and suffered the same problem. I found out that it was my own silly fault. When I was cleaning the throttle body / butterfly from the build up of carbon deposits. (Tick-over is so smooth now that I have to check it's still running.) Afterwards I decided to give the same attention to the combined MAF (Mass Air Flow) - Air Temp Sensor. In my exuberance and the use of a cotton bud I left a small amount of cotton wool on the tiny sensor at the end of the recess. In my attempt to remove said contaminant I accidentally bent the tiny 'fuse wire' sized wire supporting what I presumed to be a tiny resistor. I managed to remove the bits of cotton wool caught on the small paper clip sized metal posts and straighten the wire between them. However when I boxed everything up and started the engine, Oh dear the 'BONG' and the warning that the VSC was inoperative. After investigation it appears that if the Vehicle's Electronics can't have complete control over the engine management system then logically it can't control the VSC (Vehicle Stability Control) effectively and therefore leaves it switched off with the appropriate warning. I'm not saying this is the problem you have but for you to check any other thing that would not allow the correct operation of the engine. I fortunately own a diagnostic scan tool and was able to diagnose my problem with the defunct MAF, however it did not mention anything about the VSC being inoperative. If you think about it there wasn't anything wrong with it except it just wasn't switching on. The vehicle also went into 'limp mode' and only allowed the engine to reach around 3000 revs before it would cut the ignition. As a side note to all of you out there wanting to 'dabble' the tiny 'resistor' I mentioned before turned out to be a coil with about thirty turns of the finest wire wound round a former. As this was only about 3 m/m in length I was only able to see this after I broke the plastic end cap off and looked through a record deck stylus 50 X magnitude microscope. WARNING! If it ain't broke, don't try to fix it! A new one is £193.00 ... OUCH! I did get a used one for £20.00 and a 40 mile round trip and once fitted the VSC switched on as normal. I touched lucky at this price as everyone else wanted in the region of fifty quid. I could have taken a chance and got one from Hong Kong for about a tenner. I'm retired and located in Wallasey on the Wirral so if you are anywhere near I can plug said scanner in and see what's cooking. I must mention another point totally unrelated in that I have found a supplier, after three days of internet trawling, of the rear hub / suspension 'Rose Joints'. Dear old Lexus and most motor factor establishments don't even list them and in Lexus's case they want to supply the complete hub at a cost of £250.97 inc Vat. plus I have it on good authority from my friendly Lexus engineer that the wheel bearing may not be saved so a new one is probably on the cards. I won't repeat the verbal description he gave to the type of job it is! I only had to remove the wheel and one nut and bolt to access and replace the joint in situ. It was however quite stubborn but a big hammer and the right dolly, not too difficult. This is my first upload to this site so I'm not sure if I can advertise and mention the supplier in question save to say I've been in the motor trade for many years and their help and consideration is well worth mentioning to all. They even sent me the other bush, free of charge, so that I would have the correct one for my vehicle. There was apparently two sizes depending on the year of the vehicle as mine was on the change. Best of luck. Regards Peter A. PicassoPete (Every job's a masterpiece!) Ha-ha. :) PS. Sorry if I have waffled on a bit, still very keen.1 point
-
Sorry to hear this Stu. :( I personally think you have been a saint with how you've dealt with this idiot. The pathetic loose use of the law from his friends Dad is laughable! I can happily get a very well known UK solicitors office to knock you up a very nasty letter if you need it mate. I'd take the gloves off though Stu and go to SCC mate. Have a chat with your local Citizens Advice Bureau. They can help you with what you need. Hope you get it sorted chap. Hate seeing good guys getting done over by idiots! :(1 point
-
What a weasel..but as you say it's to be expected. I would go full tilt down the SCC route if this happened to me. Why should you foot all the bill. Chin up Stuart and I hope it gets sorted as painlessly as possible.1 point
-
I just carry a sealant and pump kit.1 point
-
http://lmgtfy.com/?q=3sge+sxe10+%20wiring+diagram1 point
-
Heck, look likes these 400's are becoming a bit of a liability, maybe I should part-ex mine for a BMW!!!1 point
-
Mine had MOT on Friday 13th and has got 260,000 on the clock and it failed on ................................................................. A tyre, oh and a bulb. Tyre was my fault, and bulb had a bad contact. What a car !!!!!1 point
-
I run MTEC drilled and grooved with Redstuff pads... I could stop a freight train... However pretty noisy on braking! No squealing, just pretty annoying fast ticking sound which is the pads hitting the holes and grooves. I wouldn't go this route again in all honesty1 point
-
Partial engine assembly part number is 19000-50040 Can be bought from Japan brand new still for just over £8000 !!! http://amayama.com/search/?q=19000-50040&cur=GBP1 point
-
Good stuff, it is very elaborate. Torque specs are as follows for those who are anal about these: - Carrier to Hub - 79 Nm - Caliper to Carrier - 34 Nm Installing a new caliper is also a good opportunity to paint it. Otherwise, it won't be long before it starts to look like the previous one.1 point
-
If you get no joy from him, go back in a crappy £100 rust box and finish the job. Serious though, good luck with getting at least something. I use a bicycle and i know how dangerous it can be, not just for me but for other road users if you are not doing things sensibly, both can use the road legally and most of the time they do get on ok. I will keep my views on organ donors, sorry i meant cyclists to my self.1 point