Do Not Sell My Personal Information Jump to content


  • Join The Club

    Join the Lexus Owners Club and be part of the Community. It's FREE!


Recommended Posts

Posted

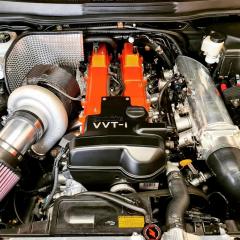
Because of the new manifold ive also had to relocated the power steering bottle, lines and cooler.

I went for a neater cooler and 1 i could mount to the crash bar.20200517_151009.thumb.jpg.a3324e6811f2bc1c51dc4f5f1a9f5e85.jpg

There is so much i have done and so much i want to show you but its so frustrating whats going on with the pics, some load some dont🤨.

So next up on my to do list was something ive been quite excited about, now that the auto box has gone i know have a steering wheel with 4 useless button on...... well was useless.20200427_182158.thumb.jpg.9680dc98ef59b4ce7f74ef297dac5e6e.jpg

these could be very usefull so i decided to pull the air bag off and have a look at the wiring. Very simple setup, front buttons are wired together and so are the rear as they both have the same opperation.

Now they dont, i manipulated the wiring and switched it up so now the botton on the right can be linked to the AEM ecu and the 1 on the left for another toy i want to fit.

20200414_124805.thumb.jpg.2fdbe60a2dea0ad70d8b3e0882a494aa.jpg

20200414_125944.thumb.jpg.e4c467514a2c3020c89a8df0f3a4f443.jpg

20200414_131413.thumb.jpg.fc7ff462329c51309cb8ec4b1b8f6a21.jpg20200414_133249.thumb.jpg.64a55fb4b1a3d85ca2a16398665bee46.jpg

so i traced the wiring on the buttons down to the junction box in the passenger footwell, i de pinned them from the plug connector and added my own wiring in to link to the AEM.20200414_153930.thumb.jpg.91062876100084d01e00cc66afda742d.jpg

Added loom protector to it then pinned it into the ecu.

20200414_160443.thumb.jpg.4bf732b51ab60df89f993a42f27e7b0a.jpg

20200414_161240.thumb.jpg.d840317fd41dc8e4e9e30ee15d2d1a10.jpg

The button on the right now activates 2step rev limiter and launch control. And the button on the left will be used for line lock... if i get round to installing it.

Dont even have to take my hand off the steering to activate launch control and still has that factory look to it!

20200414_123137.jpg

  • Like 2
Posted

I also got chance to make my own external wastegate dump tube. Was pretty straight forward just measured, cut and offered it up until it fit.20200513_150037.thumb.jpg.c3cbdb589ee40c8e4c708685436fc615.jpg

20200516_165957.thumb.jpg.d44e6996b9d2919ec19ced2cc3784826.jpg

Also managed to do a slash cut on the end of the pipe, that was pretty tricky to do using a grinder!20200516_165944.thumb.jpg.7cd84cd01a3fc975d387e831414bd66c.jpg

Another thing i managed to get done was the rear light LED conversion. Now i originally started this 2yrs ago early on in this build thread 🤣, got side tracked and didnt finish it but now was perfect chance to do it.

20200405_195706.thumb.jpg.3b3809f2b65cc53e1f0c9bb02a9e0244.jpg

20200405_230631.thumb.jpg.6093f9d5da8789cc8e019a7a6facbf9a.jpg

I also decided to do the US rear brake light conversion so the fog lights also light up with the brake lights. I had to install diodes so that when the fog lights are switched on it doesnt light up all the brake lights now the wiring is joined.

20200413_121743.thumb.jpg.48bd5ee034867676219e3157f7ed4ca0.jpg

1 thing i didnt want to do was have the fog lights light up with the side lights as i wanted those LED rings to stand out on there own. Im just waiting on some pulse width modulating boxes to dim them down a little as they are as bright as the brake lights at the moment, also the PWM boxes will allow me to use the LED rings as a brake light aswell as a side light!

20200513_150032.jpg

  • Like 4
Posted

Just realised half my update is on the previous page because ive done seperate posts 🤦‍♂️

Posted

I assume the waste gate tube will be sticking up through a new hole in the bonnet? 😁

Good to see an update, appreciate your efforts. A few videos of turbocharged IS300s have been creeping into my feed on YouTube recently; it's like they know...

  • Like 2
Posted
6 hours ago, gdh300 said:

I assume the waste gate tube will be sticking up through a new hole in the bonnet? 😁

Good to see an update, appreciate your efforts. A few videos of turbocharged IS300s have been creeping into my feed on YouTube recently; it's like they know...

Haha i would love to have it sticking up through the bonnet but there is just absolutely no room at all. I did consider maybe having it poking out of the drivers side wing but it would be pretty tricky to do. 

Ive still got loads more to post on here of stuff i have already done but the picture uploading situation is so frustrating!

Posted

Nice update Rob. Bedtime lock-down stories do need to be in picture-book format. Keep it coming when you can. I do like the rear lights.😎

  • Like 1

  • 2 weeks later...
Posted

Exhaust is now finished 20200527_161933.thumb.jpg.b12677c6b581c3c6eaafc0eb1e5196f9.jpg

20200527_161855.thumb.jpg.a1327ceb91e89186398f850e5db8708b.jpg

Fits great, just need to shortem the tail pipe as is poking out pretty far, need about 2/3 inches cutting off it. Also want to get rid of maybe 1 v band under the rear axle as its pretty close to the floor and its not been lowered yet.

Also started to repair the damage to to car from when i 1 got it. It had pretty much the whole passenger side wiped put from a drunk driver, managed to pick up 2 passenger doors in pretty good condition at £30 each!! Also got a passenger front wing that was double the price of the 2 passenger doors!

20200518_174652.thumb.jpg.d7d1e5175ab8706628e07c7f56e7f84e.jpg

20200518_174659.thumb.jpg.79113517a1eb91900000578103612426.jpg

20200519_183150.thumb.jpg.eddb9100c2f7e2f31c74224e68b29029.jpg

20200519_183157.thumb.jpg.0e175b69749d9de21772cf98c26d089e.jpg

20200519_183207.thumb.jpg.fb207b54920bcdf35b680dc808e2d7ad.jpg

got a few before pictures but cant load them aswell as the new wing pictures!

Was then tine to finally sort the clutch, i had to take the factory clutch master cylinder off as it just did not move enough fluid to disengage that huge twin disc clutch. I was gutted about this as i wanted that ni e clean OEM look to it. I attempted to use the wilwood master that came with it. This was a nightmare as the adaptor block just didnt fit nor did the master on its own with the large reservoir!!

I mananged to find a kit that wilwood did to remotely mount the reservoir somewhere else!! This was the game changer as any other issues can be delt with to make it fit and work!

This pic is the modified clutch pedal frame to take the wilwood master.

20200429_145442.thumb.jpg.1904963c6beac4cc25d7895af6fb02ef.jpg

20200429_145453.thumb.jpg.9cbfb9e4bec8ace916d0147a0450a8e7.jpg

20200429_180319.thumb.jpg.f64a5281ae8186c1678a1066fbab5a65.jpg

Below i had to change to clutch line out too for the -3AN line it came with, also had to modify the bell housing inspection clover to make it fit.

20200501_181621.thumb.jpg.0270f0bf44856d32131a2836f5d69a73.jpg

This is showing the lack of movement with the old master fully depressed, do have a comparison pic with the new 1 but cant load it.

20200427_131302.thumb.jpg.d7e7329e01988e43031855d499739968.jpg

These below is the remote reservoir setup, its a great idea if you short on space like i was and also takes it away from that hot down pipe!

20200527_211007.thumb.jpg.4bd1f38a05b1fe6dd2501db8f1b2438a.jpg

20200527_210956.thumb.jpg.ec2172d4148410e3d1e6a25139bc4687.jpg

20200528_124514.thumb.jpg.220e3edce55af44d2ba96078a0e2feae.jpg

So with all that being done it was time to test on the road! I was pretty damn nervous tbh had no idea how it was going to turn out!

She runs, idles and revs great but didnt know what it would be like to ..

1. Drive with that heavy twin disc clutch

2. What it would be like to drive under any kind of load

3. If the AFRs would be safe to drive either.

Well i cant post videos which is a real downer but it drove like a dirty pig🤣. Really struggled to pull away, light throttle driving the AFRs was very safe in the rich zone but under around half throttle it was going lean so i quickly stopped trying that. 

The thing sound absolutely nuts, the noise off that 4" system was rediculous!! 

Data log only recorded 0.8 lbs of boost so you can tell i was taking it very easy, didnt even get to hear any filthy turbo noises but just to able able to drive it after almost 3yrs of it being in bits was incredible!!


Anyone onow how i can upload videos and maybe get around the issues posting pics??

  • Like 2
  • Thanks 2
Posted

Wow, I had no idea of how close you were getting it on the road! Fantastic effort. 👍

Now you are over the trepidation you must be relived and delighted in equal measure but I guess there's still much to do before the slog of the rolling road work. And perhaps a few days in the gym to build up that left leg!

I wonder if you might be better uploaded your videos to YouTube? There'll be interest beyond this forum as well.

  • Like 1
Posted

No idea on the video hosting but I hope you get it sorted.

Have been watching this thread for a long time now and it's great to hear that it's moving under it's own steam at last 😎

Great work!

  • Like 1
Posted
12 hours ago, gdh300 said:

Wow, I had no idea of how close you were getting it on the road! Fantastic effort. 👍

Now you are over the trepidation you must be relived and delighted in equal measure but I guess there's still much to do before the slog of the rolling road work. And perhaps a few days in the gym to build up that left leg!

I wonder if you might be better uploaded your videos to YouTube? There'll be interest beyond this forum as well.

Cheers matey, yeh im over the moon it felt amazing to behind the wheel again and see the damn thing move. Yeh i think your right you tube is probably the best way.

Yeh im going to be needed a huge left leg if ever i get stuck in traffic anywhere🤣.

Yeh there is still a few bits, i have coilovers coming soon, also need wheels but this is turning into a real problem to find something nice with the correct offset.

Also need to do little bits of heat protection for the engine bay by the down pipe and the steering rack where the wastegate tube is.

Posted
13 minutes ago, Jaystar77 said:

No idea on the video hosting but I hope you get it sorted.

Have been watching this thread for a long time now and it's great to hear that it's moving under it's own steam at last 😎

Great work!

Thanks mate, its been a long time coming and tbh whilst ive been off work ive just thought if ever there is a time this is going to get done its now.

Literally not stopped on it, ive got so much done and each little thing completed has pushed me onto the next thing

  • Like 1
Posted

Don't know if I missed it - or more likely I might just have forgotten! - but are you fitting fire suppression under the bonnet?

  • Like 1
Posted
On 6/1/2020 at 6:35 PM, gdh300 said:

Don't know if I missed it - or more likely I might just have forgotten! - but are you fitting fire suppression under the bonnet?

Do you mean like what rally cars have like a plumbed in extinguishing system that can be activated from the outside? 

No i wont go as far as that although that would be an amazing feature to have. I need to sort out some heatshield for the brake servo, loom and clutch master cylinder though aswell as the steering rack pipes as they are close to the wastegate tube


Posted
4 hours ago, rob_clio172 said:

Do you mean like what rally cars have like a plumbed in extinguishing system that can be activated from the outside? 

Yeah, but they are expensive, and quite bulky by the looks: https://www.demon-tweeks.com/uk/motorsport/car-preparation/fire-extinguishers-accessories/fire-extinguisher/plumbed-in/

I guess if you have a sensitive nose and a hand held extinguisher, you should be OK. 😉

  • Like 1
Posted

............It's alive!! 

Well done mate, I bet you're chuffed after all this time. You Tube is the easiest route to posting a video. That's where I stuck mine. Easy to set up and publish but I was hopeless at making and editing it. That's the tricky bit but real time footage in the IS will be all we need without any professional voice-over or background music.

A bit of tuning, tweaking and finishing and then we need a little Lex meet for a proper unveiling.

  • Like 1
Posted
9 hours ago, Neil E said:

............It's alive!! 

Well done mate, I bet you're chuffed after all this time. You Tube is the easiest route to posting a video. That's where I stuck mine. Easy to set up and publish but I was hopeless at making and editing it. That's the tricky bit but real time footage in the IS will be all we need without any professional voice-over or background music.

A bit of tuning, tweaking and finishing and then we need a little Lex meet for a proper unveiling.

Thank you and yes mate it was that moment when i pulled away it made it all worth while. Blood, sweat, tears, ups and downs all for that moment. 

There was points i wanted to throw in the towel and points i thought i would never have this on the road so for that moment to happen was monumental.

Still work to do but now its all easy and relatively pain and stress free.

  • Thanks 1
Posted

So the coilovers come and i wasted no time in fitting them!

I went for BC racing BR series coilovers, adjustable height and 30 way damping settings. Great quality and as coilovers go they was relatively cheap.  

20200604_123821.thumb.jpg.5d85a6a6f5fabdc27ba9b300dfe77bdc.jpgspacer.png

managed to give the arches a good clean out whilst i was there.

spacer.png20200603_145419.thumb.jpg.a3e9ffa36d697ef151449b284e1ffa7a.jpg

Got the ride height just as i wanted it, will need to look at this again when the new wheels and tyres are on, cant go much lower though as the exhaust is pretty close to the road!

20200604_171930.thumb.jpg.1a69dbb8b19bf8a4f083d9c6bd572ef1.jpg

Excuse the miss matched wheels its only temp.

So out of 33 pictures i tried to load of the whole process only 3 have actually loaded. Got loads of before and afters but again unable to post them 🤨


  • Like 1
Posted

Another little side project ive started was this.... I got my hands on an old nav unit, pulled the screen out and set about making it work to house my AEM gauges. TBH it was pretty easy, just needed permanent 12v, ignition 12v and a ground.

Just need the find something nice to mount them into then bond that to the nav housing, also just need to make me a little loom and hook it up to the radio wiring for the feeds.


Also got a short tease video of the exhaust....

  • Like 3
Posted

Just a small update..... 

Ive almost finished the sat nav/gauge holder project.20200605_150918.thumb.jpg.59284ee670217a7b4ae390cfeaf27613.jpg

20200610_214336.thumb.jpg.929092d67207157985d5ac33a431360e.jpg

Found a nice piece of stainless steel plate with a brushed finish to it on eBay.

Measured, cut and smoothed the edges off then mounted it inside the lid.

20200609_205934.thumb.jpg.1d5c430b93643c0b4cfd02103dd27139.jpg

20200610_212303.thumb.jpg.e0fc304aa45fd71da9191d3c6da54738.jpg

It came out great, just need to sort the wiring out and add new plugs so im able to remove the unit if i need to. The just build it back up and test.


Posted

Also finished the rear lights off, finally fitted the diode dynamics PWM boxes to dim the LED rings and make them brighter once the brake is applied.

20200606_222642.thumb.jpg.f050114a6eb41a51f2b39cf8e69f8167.jpg

20200606_222811.thumb.jpg.b2b7d909c5994b03381a3a614d79ebee.jpg

20200606_222621.thumb.jpg.37b6f2927d05e83fa8ebddf07ccf6dc8.jpg

20200606_222729.thumb.jpg.70ba5065d60adaffaef86767df107343.jpg

Very happy with the results, has a little unique touch to it.

20200606_180944.thumb.jpg.2c11688a4a1a985b6f80b381e8b73eec.jpg

Also was able to refit all the boot trims!! These have been stripped out and sat in my spare bedroom since i got the car!! Ive also cut 2 holes in them so i can access the damper adjustment on top of the shocker.

  • Like 2
  • 3 weeks later...
Posted

Small update, managed to get the gauges finished in the nav unit and it turned out really good! Over the moon with it, just need to see if i can get the proper plug connector from Toyota for the unit.

  • Like 5
Posted

Love it, I do like a gauge or two, very smart Rob. Have you considered tapping into the OBD2 port for more info?

Posted

Yeh i have thought about it, been looking for something nice i like to mount somewhere. Theres only really a couple more things i want to monitor really, oil pressure and temp is definitely 1 i will install but will require a sensor putting into the sandwich plate and the other is fuel pressure, incase i ever have any running issues its an easy thing to check and eliminate.

Also with the oil pressure 1 its a good fail safe to put into the ecu where it can cut the engine out if ever it sees an oil pressure issue potentially saving the engine.

Posted

Well if you do head in that direction, I've just started experimenting with Bluetooth OBDlink MX+ and It seems pretty good so far. You may know more than I.  It only reads the PIDs but the user can set upper and lower level warning points on a display or gauge. Works with Android, IOS and Windows and creates data log files for any of the parameters chosen to be logged. Logging data from many PIDs did seem to slow it down in real time display mode but worth a look if you need the info. I guess you will be headed for a rolling road session for a proper tune at some stage.


  • Like 1
  • 1 month later...
Posted

Bit more to update, ive got hold of a 2nd hand front bumper that needs painting and also bought a front lip to go with it. 

Gave it a trial fit and fettled with the lip to get it right, need some stronger bond though to get the brackets to fit. 

20200713_150424.thumb.jpg.4c5c8ba415ee5bc752bdf88d8d808462.jpg

20200713_150434.thumb.jpg.48a9b23652ba9f39cb697df3f60993dc.jpg

20200713_150451.thumb.jpg.07c54195ab74ede61bdfdc86a3367319.jpg

20200713_150515.thumb.jpg.01e7a590c9137b441b4bd3c1b13a0d2e.jpg

20200721_161245.thumb.jpg.44f72958764846f0c9482d57ee9b5bc9.jpg

20200721_161257.thumb.jpg.a13a227ff7bda40ec36f2be302a6778b.jpg

20200721_173250.thumb.jpg.f39f9b5f5263cf574fc06623040bede7.jpg

20200721_173308.thumb.jpg.b6d68cd2803ee445fe59bb9ecf1594dc.jpg

20200721_173256.thumb.jpg.53d0e49017324609773f6804564ab92a.jpg

As you can see the lip is too long for the European front bumper so i had to carefully cut the edges flush with the edge of the bumper.

As for the headlamp washer jet covers i was going to fill the hole and smooth it off but i think its going to be tricky to replicate to lines of the front bumper. Im just going to get them painted and bond them on.

  • Like 1

Latest Deals

Lexus Official Store for genuine Lexus parts & accessories

Disclaimer: As the club is an eBay Partner, The club may be compensated if you make a purchase via eBay links

Create an account or sign in to comment

You need to be a member in order to leave a comment

Create an account

Sign up for a new account in our community. It's easy!

Register a new account

Sign in

Already have an account? Sign in here.

Sign In Now


Lexus Owners Club Powered by Invision Community


eBay Disclosure: As the club is an eBay Partner, the club may earn commision if you make a purchase via the clubs eBay links.

DISCLAIMER: Lexusownersclub.co.uk is an independent Lexus forum for owners of Lexus vehicles. The club is not part of Lexus UK nor affiliated with or endorsed by Lexus UK in any way. The material contained in the forums is submitted by the general public and is NOT endorsed by Lexus Owners Club, ACI LTD, Lexus UK or Toyota Motor Corporation. The official Lexus website can be found at http://www.lexus.co.uk
×
  • Create New...