Do Not Sell My Personal Information Jump to content


  • Join The Club

    Join the Lexus Owners Club and be part of the Community. It's FREE!


Recommended Posts

Posted

Big update..... wheels have come. Enkei RPF1's, packaging was really nice with card top and bottom of the wheel and shaped around it, also had an elasticated fabric cover over the face of the wheel too. 

20200805_194826.thumb.jpg.f0430d4c9ce5d730b665de0d2b0c0d94.jpg

20200805_192051.thumb.jpg.a8a461f0cb904b2baa481d6452d30313.jpg

20200805_191450.thumb.jpg.b39029692437bf9692f7c0c9615f0389.jpg

20200805_192011.thumb.jpg.591d44455084c91fdcb1273dfb1c8cda.jpg

20200808_133548.thumb.jpg.f414f143a8e596348230674bbaba654c.jpg

1 here to show the width of the 255/35 R18 rear tyre compared to a 215/45 R17.

20200808_135239.thumb.jpg.8779e3db8ccd22eb7e208b361ac6e8d4.jpg

20200808_141318.thumb.jpg.941b22da84ba39a2202a3114cbbd9df5.jpg

20200808_141332.thumb.jpg.bcfff96e7eb05e02623c7fd35119cb90.jpg

20200808_141352.thumb.jpg.ffdf29e4fcfb0835aa0122c4c0a2d3f4.jpg

20200808_141414.thumb.jpg.bec068f813a5ce48c3679f8f5817e0e8.jpg

20200808_141512.thumb.jpg.5d46f9665780c76b29b682475bd0f545.jpg

Suspension is not settled in the pictures as i had just dropped it off the jack and stands, i think im going to have drop it another half inch or so after the suspension is settled.

Really happy with the offset they are flush with the arches if you look from above.

Also got some nice RPF1 caps to to drop in too but i want to treat the wheels with some colinite first for a bit of protection.

  • Like 5
Posted
2 hours ago, LexIS200Sport said:

Suits it very well! 👌


Cheers matey

Posted
18 hours ago, TigerFish said:

They look good emoji41.png


Sent from my iPhone using Tapatalk Pro

Thanks man🤘

Posted

Managed to lower the suspension  a little more, dropped another 15mm on the back and 20mm on the front. It will settle some more after a drive but i think it will be spot on.

20200812_195336.thumb.jpg.983c12d51b764eeb20498394ce47ffd8.jpg


20200812_195423.thumb.jpg.1b5d56b4c524620a657b51f1ba2c55ba.jpg

20200812_195445.thumb.jpg.801571f802d3411536e1dc298d4e4708.jpg

Also chopped that massive tail pipe finally, can walk around the back of the car in the garage now without having my shins cut and bruised🤣.

20200812_125304.thumb.jpg.cd1cf400aae9a5f9f4f64e548d129fd3.jpg

20200812_125251.thumb.jpg.a89c3978e8ef4211d06361437362f9c3.jpg

20200812_125238.thumb.jpg.6f265374c3d1c3d693db02ca615d4f3d.jpg

  • Like 3

Posted

Couple more shots of the car out on the drive now with the new ride height. Not taken many pics of the full outside of the car since ive had ot but now its looking half decent i have reason too.

20200813_235355.thumb.jpg.26e0c1dccc9276894e5e131c15e517f2.jpg

20200813_234218.thumb.jpg.9218ba7dec17b0e5d64bfefa72c96f75.jpg

20200813_234531.thumb.jpg.0e550818a7b92c7037180fc1f841b994.jpg

20200813_234629.thumb.jpg.9b7c67f8113c4988ac413a2659642983.jpg

Also loving the look of these wide rear tyres/wheels, really does give it that aggresive look.

20200814_181321.thumb.jpg.417816db5e4c6e9dd86623561fe590f7.jpg

still more to come when i get the wheels treated and the center caps fitted, almost ready for the bumper to be painted..... still need to sort the brakes too.

  • Like 3
Posted

Looking lovely, mate. What's the plans for the wheels?

Footnote: God, I imss my IS300

  • Like 1
Posted

Very good Rob. Stands nicely, looks purposeful without being too obvious or wild. I guess the noise is going to give it away otherwise I could roll up to you at the lights not expecting to be completely humiliated. 🤣

Are the next set of rears on order? Some of the members on here with share portfolios looking for future dividends might like to know which tyre manufacturer you favour? 🙂

Posted
2 hours ago, gdh300 said:

Looking lovely, mate. What's the plans for the wheels?

Footnote: God, I imss my IS300

Thanks mate, Just a couple of coats of collinite wax i think should do the trick, it wont be seeing any bad weather or road salt so thats a big wheel wrecker i dont have to worry about. 

Just seen the footnote.... when did you get rid of the IS300??

Posted
22 minutes ago, Neil E said:

Very good Rob. Stands nicely, looks purposeful without being too obvious or wild. I guess the noise is going to give it away otherwise I could roll up to you at the lights not expecting to be completely humiliated. 🤣

Are the next set of rears on order? Some of the members on here with share portfolios looking for future dividends might like to know which tyre manufacturer you favour? 🙂

Cheers 👍, haha yeh its pretty loud although on idle its not too bad... its just that deep noise when pulling away that will give it up. 

I will go for the Toyo R888r after these, i got these very cheap through work (£5 per tyre!) As they was taken off a sales car, i wouldnt normally go for Nankangs although these are there track tyre and have a few decent reviews, i just couldnt turn down that very cheap price to get me going on the road. I think if i go down the R888r route i will also switch to a 265 on the back rather than the 255

  • Like 1
Posted

So i got the wheels waxed, spigot rings and center caps fitted and thrown back on the car.

20200816_133155.thumb.jpg.91b8e6ac548fea6b39610991c9226311.jpg

20200816_142712.thumb.jpg.e7e6a63e333f10c5b85973aa28a23690.jpg

I also decided to weigh the wheels and compare them to the old 1s just out of interest.

Even though the wheels and tyres are bigger they are 5 1/4 lbs lighter on the front and 4lbs lighter on the back. 

20200816_131427.thumb.jpg.93afb64b0f541ca1bc207d442a55e97c.jpg

20200816_131550.thumb.jpg.ee27c9572aacf81d4be030dae3fd3b2f.jpg

So an 8.4kg saving all round which tbh is very suprising, im not getting too caught up with weight saving as im not really going down that route....... yet, but still nice to know.

  • Like 4
  • 1 month later...
Posted

Had a few more bits turn up this thing is still slowly coming together.....

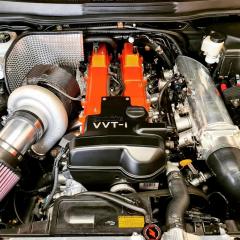
Got myself a turbo blanket, this is much needed as the small amount of driving and testing has already started to affect the valve cover paint!!

Also got some wrap for the down pipe so will eventually get round to doing that.

20200930_211306.thumb.jpg.ba4dbc29fd62e695f790c057affe07e6.jpg

20200930_211326.thumb.jpg.0f5da6d7cf60a56aa34c7f5d01e5cc80.jpg

20200930_211312.thumb.jpg.c925fd14b683f1239ee3082859ecf0f3.jpg

20200930_211722.thumb.jpg.5340009f10789934eaed9a9035449f97.jpg

20200930_211735.thumb.jpg.6556ae231dd165ba25b656f368788284.jpg

Finally got an oil pressure and temp gauge, i went for the SPA digital gauge. Real good bit of kit, can programme hi and low alarms for both channels, choose what colour backlight and also what colour alarm backlight flash.Went for amber to match the dash lights.

20200929_144704.thumb.jpg.a06826379c5287ab5518af7965eb40bf.jpg

20200929_144709.thumb.jpg.649dab63ba0d870253b971e522b08663.jpg

20200929_193816.thumb.jpg.65351c4311fd7fe5b21775bfe23ba7bc.jpg

Managed to trial fit it quickly to test the kit and programme the settings, just need to get it installed now. 

  • Like 3

Posted

Had not seen an update for a little while so assumed you were out on the road munching M3s and assorted unsuspecting exotica.🤣

  • Like 1
Posted
2 hours ago, Neil E said:

Had not seen an update for a little while so assumed you were out on the road munching M3s and assorted unsuspecting exotica.🤣

🤣 not yet but hopefully soon, just tying up loose ends now before mapping. 

  • Like 1
  • 3 weeks later...
Posted

More progress and another step closer to getting this thing ready for a tune. 

Finally tackled getting all the heat management bits installed.

Wrapped the downpipe and dump tube.

20201015_160714.thumb.jpg.733d1015f8da49a638917facd245330c.jpg

Made 3 seperate heatshields up top and joined them all together to protect the oil feed, brake and clutch master cylinders, servo, matrix hoses, wiring loom and vac lines to the wastegate.

20201016_124024.thumb.jpg.9977adaa29b099237721355869d951a7.jpg

Its a double layer heat shield and suprisingly easy to cut and shape around things.

Under the car i replaced the old small inadequate heatshield.

20201015_140147.thumb.jpg.8678b3bdbfaa1e44589e4c8240660da3.jpg

20201015_144803.thumb.jpg.49f399688c75b44dcc47167b05c30a63.jpg

Also made another shield to go over the steering rack to protect the rack fluid lines from the dump tube.

20201016_145100.thumb.jpg.1b232852c047804ab988a435bba7d554.jpg

20201016_151431.thumb.jpg.b42a2dde01f3708509517d082efc2661.jpg

Then threw the down pipe, dump tube and turbo blanket on. Turbo blanket is from funk motorsport, its there new mk3 version, does a great job and fitment is absolutely perfect.

20201016_153544.thumb.jpg.fc04d9a4cf6fe3bced9c526ce7b953a7.jpg

20201016_153612.thumb.jpg.0cdf3662c2a34f9551693b9d59f119f4.jpg

20200930_211755.thumb.jpg.bbd49e4c5b65287d5ccd54f78319292a.jpg

Just waiting on some edging for the heatshield stop me potentially slicing myself on it, so happy with how its turned out.

  • Like 2
Posted

I just love the detail on this project Rob. Branded stylized heat-shield......it puts the heat wrap on my headers to shame.🤣

  • Like 2
Posted
2 hours ago, Neil E said:

I just love the detail on this project Rob. Branded stylized heat-shield......it puts the heat wrap on my headers to shame.🤣

🤣 thanks mate, im over the moon with how it turned out and i really thought the shielding would have been a real pig to shape and make it look half decent but it was pretty damn easy.

  • Like 1
Posted

Just catching up on your progress and you've done a great job pal, well done.

  • Like 2
Posted
9 hours ago, Farqui said:

Just catching up on your progress and you've done a great job pal, well done.

Thanks for the kind words 👍

  • Like 1
Posted

Small update, i finished the heatshielding off with some rubber edging trim. Its seems to have transformed the look of it by just tidying it up. 

20201022_170157.thumb.jpg.14bcb332fbc32bd06f9fa800dad921e1.jpg

20201022_170316.thumb.jpg.a22ab83e9f45a172d2284bb979a57123.jpg

20201022_170223.thumb.jpg.ab2ecbf62cbb80cb287ff6f5ac296011.jpg

More to come, exhaust hangers are getting sorted aswell as the prop hoop which is slightly too wide. 

Oil gauge i need to install properly and get a fuel pressure sensor wired up to AEM. Also ive got a new breather setup coming as im not happy with this 1, it may give be problems when the boost is cranked up.

  • Like 4
  • 2 weeks later...
Posted

Amazing work Rob!

One word - WOW.

If I had even half of your skills, I would be all over mine....looks like I will have to settle for someone to tweak mine for me, in a mild sort of manner, probably a turbo kit with a few others mods.

What sort of power are you making now?

IceBoy

  • Like 2
Posted
2 hours ago, Iceboy said:

Amazing work Rob!

One word - WOW.

If I had even half of your skills, I would be all over mine....looks like I will have to settle for someone to tweak mine for me, in a mild sort of manner, probably a turbo kit with a few others mods.

What sort of power are you making now?

IceBoy

Thanks mate, yeh some of the turbo kits out there are pretty good, all depends on your power goals and budget. 

Not sure on power at the minute as its got fuel cut set at 16psi and doeant have a proper tune but it feels pretty quick already just being tickled. Im hoping for around 600-650 at the wheels, it may not make that but will be super happy if it does.

  • Like 1
Posted

So ive continued to make progress, i now have the prop hoop sorted. 

The hoop itself didnt fit as the holes was too wide for where it bolts to the original prop center bearing holes. Ive had to cut the brackets off, shorten them by an inch and angle them in slightly so the holes measure 147mm apart.

20201109_142120.thumb.jpg.ae28f0a2e0880eb5d2809db0aba14c5f.jpg

20201109_142623.thumb.jpg.1c73b35c5dd0a3ae8d9047a1e766099e.jpg

20201110_095057.thumb.jpg.3faa72a9b1d42a1293c8350008659258.jpg

Then gave it a quick coat of Zinc 182 primer and a couple of coats of matte black paint to tidy it up and for some protection.

20201110_110204.thumb.jpg.1fd75e0d5e0fd80b4da064ba7339f95f.jpg

20201110_154602.thumb.jpg.66b69d2f555c492f7ece0091f5c403fe.jpg

20201110_162814.thumb.jpg.d27cab5ca44b784cc48ac97b76377f4c.jpg

I feel happy now this is sorted, if it does ever break it will cause alot of damage but at least it cant pole volt me off the road!

Also got the SPA oil pressure and temp gauge sorted, this was a bit fiddly but got it done. I used the old A/C drain plug under the carpet to feed the wiring loom through, i have no need for it now the A/C has been ripped out.

20201110_111914.thumb.jpg.4e800a9d450131312024a9040b11e124.jpg

20201110_222308.thumb.jpg.59081ccfe9d9d10c176dcc9471471332.jpg

Still has a little room left in it for when i fit a fuel pressure sensor into the FPR. 

20201110_134341.thumb.jpg.c2805ac3d5c430d6ac550d4c96189298.jpg

20201110_134133.thumb.jpg.d44e1c8aa1c69a4dd3380b81114fce79.jpg

got all the wiring routed through and fuse fitted. Also mounted the programming switch for the gauge under the trim for the heated seats so nice and hidden.

I then mounted the bracket for the gauge also under the trim by drilling a little hole and putting a nut and bolt in there.

20201110_150417.thumb.jpg.9060c27fbf1bbaf2a24922481952c8c5.jpg

20201110_150532.thumb.jpg.07398eaa42904decd8ca37528142cdf0.jpg

20201110_150639.thumb.jpg.bc22ac07e215f007f07b12632caa1e65.jpg

Turned out really well and also matches the colour of the rest of the dash lights.

Also got the exhaust hangers done finally, it only had the small 1 at the very back the car that was for the rear silencer and a hard bracket bolted to the rear subframe, the front part was being suspended by the downpipe and flexi joint taking the full weight of it. 

I managed to get 1 each side of the exhaust so when they was located it hung perfectly inplace up to the flanges each end. I had to install my own hanger at the front in the transmission tunnel for this.

20201016_174923.thumb.jpg.f5e7ae7ea5d05141e046bb0a8e558fed.jpg

I did this by removing the carpet and drilled 2 holes through the body, i then used riv nuts in the body so i could bolt the hanger up. Also made sure the body was protected after driling so the old tin worm dont set in.

I got the hanger rods bent and welded at work they turned out pretty good, i just need to bend the ends a little more where they come through the mounts.

20201110_172247.thumb.jpg.1a2872b8bee82416ecc6562484a149d2.jpg

20201110_172403.thumb.jpg.c3d02ce4cbd0da2c4106c773affe5ccb.jpg

20201110_172446.thumb.jpg.84ba01d4ae108eb142ccf46dac57ca2f.jpg

So thats the exhaust finally finished, next up is probably going to be the catch can setup then maybe brakes or paint work.... we will see.


  • Like 1
Posted

This car just keeps getting better.

Really look forward to see this beast in person someday. Brings back memories of @sparkystav and @ormi's IS200 (turbocharged and supercharged respectively).

When it's all done, you should take it to Lexus for an oil change just for laughs  😛


  • Like 1
  • Haha 1

Latest Deals

Lexus Official Store for genuine Lexus parts & accessories

Disclaimer: As the club is an eBay Partner, The club may be compensated if you make a purchase via eBay links

Create an account or sign in to comment

You need to be a member in order to leave a comment

Create an account

Sign up for a new account in our community. It's easy!

Register a new account

Sign in

Already have an account? Sign in here.

Sign In Now


Lexus Owners Club Powered by Invision Community


eBay Disclosure: As the club is an eBay Partner, the club may earn commision if you make a purchase via the clubs eBay links.

DISCLAIMER: Lexusownersclub.co.uk is an independent Lexus forum for owners of Lexus vehicles. The club is not part of Lexus UK nor affiliated with or endorsed by Lexus UK in any way. The material contained in the forums is submitted by the general public and is NOT endorsed by Lexus Owners Club, ACI LTD, Lexus UK or Toyota Motor Corporation. The official Lexus website can be found at http://www.lexus.co.uk
×
  • Create New...