Do Not Sell My Personal Information Jump to content


  • Join The Club

    Join the Lexus Owners Club and be part of the Community. It's FREE!


Recommended Posts

Posted
2 hours ago, Northern isf said:

Love the orange touch superb 👍 

Thanks man, i was debating for sometime on a colour then decided on that.....took me a while to find a place that would do the exact colour i wanted though!

  • Like 1
Posted
21 hours ago, rob_clio172 said:

Thanks man, i was debating for sometime on a colour then decided on that.....took me a while to find a place that would do the exact colour i wanted though!

No problem it's nice to see a project like this taking shape,

Definitely the right choice wouldn't mind a shade like that on my calipers.

  • Like 1
  • 1 month later...
Posted

So just realised its been a whike since i updated this! Not much done really life has took over and been flipped 180 so this had had to go on the back burner! 

Anyway ive managed to finish the fuel lines and also installed a sytec fuel pressure gauge on the FPR20190220_204013.thumb.jpg.a509bc036e0dfbb00632966ea6ff903b.jpg

Also managed to make the oil feed for the turbo aswell, used -4 braided ptfe hose andfittings all from viper performance.

20190224_135939.thumb.jpg.93feeb611e31b525737d95e3c093ec78.jpg20190224_135949.thumb.jpg.a627848ae4587074ec511b4e4858655a.jpg

managed to neatly run it around the engine and down to the mishimoto sandwich plate. All the fluids are in and next up is the Battery relocation. Once that is done i can sort out the vac lines and turn the engine over to get the oil round. Few more things i need to do before i can fire it up on the base cal.

Also if any of you guys are on instagram, give me a follow on there, i post things on there pretty much as soon as they are done 👍

lexus_turbo_2jz

  • Like 4
  • 3 months later...
Posted

Been a loooong time!!!! So the Battery relocation has started. 20190513_192327.thumb.jpg.5ffc9441b23d0971314f4501c04f030f.jpg

140amp circuit breaker, motamec Battery tray, 2 post junctionbox, bunch of terminal connectors and all the cable.

20190624_112945.thumb.jpg.9cafab4db9f13f95616aa50915709fa2.jpg20190624_112950.thumb.jpg.5d0e89d3ec482543f4b1800ac136b622.jpg

ripped all the rear seats and front passenger seat out.

20190624_113028.thumb.jpg.e5547e377f17a60c620faf83e8d7b679.jpg

20190624_113005.thumb.jpg.1b6a0aced5cc520b0199d394f85ac655.jpg

Pulled all the carpet up to find a decent place to hide it. 

20190624_132621.thumb.jpg.699d4df66a93d7d6f4ae29f9ebf19392.jpg

20190624_132652.thumb.jpg.d1518226b33cb54899d5492d5f2c9a1e.jpg

Managed to push the cable through a hole in the wiring harness grommet in the firewall.

20190624_132553.thumb.jpg.078b669fd0962c9e7cf7b8977bdb6e6b.jpg

Mounted the junction box.

20190624_132508.thumb.jpg.9a23d096a624e1dfeaaed7107b25ac82.jpg

20190624_132534.thumb.jpg.6ea0446dccf6382ac0974ef382b952fa.jpg

Mounted the Battery tray....

20190624_133335.thumb.jpg.80067da3c063d404d2f65578eed53149.jpg

Then realised the power cable is about half a metre too short!! 🤦‍♂️ so ive ordered another metre and a crimp joiner. Once thats come i can mount the circuit breaker and finish it off.

  • Like 3
Posted

Trailing socket will sort that, fella! 😉

Good to see you're still "on the case". Starting to think you'd found something else to do!

  • Like 1
Posted

Hi Rob, good to hear from you again.

  • Like 1

Posted

Yeh progress has been very slow, big change in my life since xmas and struggling to get time on it........ but

... im not giving up no way, im to far into it to give up and still chasing the dream.

  • Like 1
  • 2 months later...
Posted

Right so the Battery relocation is finished at last, it could have been a little neater but i had a last minute change of mind of where to locate the circuit breaker but it will do.

20190902_102350.thumb.jpg.e448b75dd5549ff9af0418bfec1eef95.jpg

20190902_102429.thumb.jpg.641086b58de35a8b1dc9da22429c4c5d.jpg

20190902_121639.thumb.jpg.6163618f195f5ecb418b01bc9acf527b.jpg

20190902_121712.thumb.jpg.80d8e061341518634cdfea3cc9767273.jpg

20190902_140318.thumb.jpg.2d7f7a893cfbe4e29dab7d7d92e3e003.jpg

20190902_140331.thumb.jpg.b00a382d6d9239509b2b3330d29cb72a.jpg

20190902_140605.thumb.jpg.7a2c604ec2922eac7f275b0874a4322e.jpg

  • Like 5
Posted

So on to the intercooler pipework now

20190904_210134.thumb.jpg.87c6283d112ead7cd80fcabde5fd8249.jpg

need to cut, chop and weld to get this to fit. 

Not done alot just made a start on cutting the hole in the engine bay to route the pipework.

Got myself a 90degree elbow form viper performance 2.5 inch to 3inch for the 3 inch pipework 

20190904_203156.thumb.jpg.3230b0ea5460101e01837a6611d5a6a5.jpg20190904_203147.thumb.jpg.5e32a4f3666deb68f08f24ca0a8930df.jpg

Got this cutter from B&Q, cut the metal very easily!

20190904_204352.thumb.jpg.6ea3b22934c3e7678c434ea7bd5290a3.jpg

20190904_204305.thumb.jpg.db0710ead77b4a0ec465a413cdf4938d.jpg

20190513_205353.thumb.jpg.73448e7b7801741037032459d1c70c2c.jpg

20190513_205405.thumb.jpg.fa678ba6d4a248b588cd2cd81c3a4e65.jpg

20190513_205414.thumb.jpg.6a0aa728a02f89285b4edc2af076b49a.jpg

still loads to do!

  • Like 3
  • 3 months later...
Posted

Wow loads has been done since the last update....

20191127_105728.thumb.jpg.92da4166945c5b396b3d830a7cb647b2.jpg

Power steering bottle, bracket and pipes sorted! Filled with fresh toyota fluid.

AEM afr gauge wired up to the AEM v2 ecu.

Fuel pump wiring completed, nice simple circuit set up, relay with 12volts ignition feed which then supplies the pump with 12volts direct from the Battery and a cut off switch installed in the cup holder.

20191127_160531.thumb.jpg.a6d58869d9739041a2ff7e5faffa095d.jpg

I did have an issue with this, the 12volts ignition feed for the relay which i took from the cigarette lighter is not good enough.... on cranking the engine the 12volts is cut causing fuel pressure to drop! I changed this to 12volts ignition from the barrel. You can see in the video here the pressure drop as the voltage drops out... 

The noise you can hear is air in the fuel system when its 1st been switched on

(Some reason im having a problem loading the pictures onto here, some will but most wont)

Then it was time to load the base calibration onto the AEM.... more problems. I was only getting 4volts at the AEM power wires. Very strange reading which changed whilst pulling other plugs from the patch harness... anyway cut a very long story short and after some very late nights working on it it turned out to be a sticking relay causing a volt drop which the AEM takes its power from!

20191205_141244.thumb.jpg.a02c3bd74c2de20c390509c94fe9d7af.jpg

Base cal now loaded and little things set like Battery offset for the injectors, TPS and timing sync.

Finally fitted the cover to the ecu box in its new location....

20191211_015245.thumb.jpg.6148cd7d73dc5d388af9d30d368ce713.jpg

Was then time to attempt a start, 1st attempt it started and stalled, just needed a small adjustment to the throttle. 

Then 2nd attempt......

SHE RUNS!!!!!!! Bit groggy and hunting but it soon levelled out!

Im absolutely over the moon, so much hard work, blood, sweat and tears has gone into this to get to this point!! Ive had some help from a car friend of mine who knows the AEM like the back of his hand! This was a massive step to me in this project after completely rebuilding this engine and extending the wiring harness i was worried i would have issues.

During that you can hear a metallic type chinging noise, this worried me pretty bad....

20191230_004132.thumb.jpg.fc911ef8879051954d5b7784f93db3f5.jpg

The huge SPEC clutch assembly was catching on the bell housing inspection cover, so ive made a small adjustment to that and its all ok. Thank god it was just that!!

  • Like 9
Posted

Well done mate, congratulations; a lot of hard work and late nights there. Really missed your updates!

A very Happy New Year to you, looking forward to your progress in 2020. 😊

  • Like 1
Posted
13 hours ago, gdh300 said:

Well done mate, congratulations; a lot of hard work and late nights there. Really missed your updates!

A very Happy New Year to you, looking forward to your progress in 2020. 😊

Cheers mate, happy new year to you too 👍

Posted

Well done Rob, good to see you're back on it. That's a great result. All the best for 2020.:cheers:


  • Like 1

Posted
On 12/31/2019 at 12:23 AM, Neil E said:

Well done Rob, good to see you're back on it. That's a great result. All the best for 2020.:cheers:


Cheers mate, you too happy new year

  • Like 1
  • 1 month later...
Posted

Some more loose ends tied up, finally put the interior back together. Its been a long time with it all stripped i forgot how good these cars look for there time.

20200128_161055.thumb.jpg.743a8a02a0a4ef5b9919e6750f986941.jpg

(So i cant load the all import pic of the seats back in as it keeps showing me a warning message saying -200) ???

Any way..... ive also started on the exhaust. This has had to have some fabricating done to tuck the huge 4inch system up to the body to help not grounding it out. 

20200203_195101.thumb.jpg.d2ed75b8ecfe7a578a0cd0072cb0005f.jpg

20200203_194951.thumb.jpg.87f54775fade5518049c8fed6a4aca58.jpg

20200203_195028.thumb.jpg.ed28f38ed7e873cc7a31c6a3bdb7769c.jpg

As you can see its sitting pretty close to the prop shaft, its also very close to the drivers side lower arm inner joint, im planning on heat wrapping certain sections of the exhaust to protect components from heat.

I currently have the center section off the car and im repositioning the vband to get the exhaust to angle better towards the body. Pics to follow..... hopefully!

Ive also fitted the accelerator cable, i got a universal 3meter kit off eBay and just cut to to fit.

20200205_180533.thumb.jpg.4bfe268fd6270e4067a60499575c1b85.jpg

20200205_180605.thumb.jpg.3d46c8abe1cf57a297f336a7b8e4651b.jpg

20200205_180637.thumb.jpg.d61b254ecafa5105cd3f5d9ef47ef488.jpg

20200205_181134.thumb.jpg.f08bba9fbfeb6dc67fe6d078b59e6c70.jpg

As ive had to flip the throttle 180 degrees the cable is now attached from the underside, this has also allowed me to tuck it away neatly. 

Ive been left with a small issue though, i cant get a fully open throttle the pedal is hitting the carpet. So looks like i will be removing the pedal and bending it up to allow more travel. 

  • Like 3
Posted

Great stuff Rob, as always. I find the work you're doing absolutely mind boggling.

I also just checked and I've had three Lexus since you started this :biggrin:

  • Haha 2
Posted
14 hours ago, rich1068 said:

Great stuff Rob, as always. I find the work you're doing absolutely mind boggling.

I also just checked and I've had three Lexus since you started this :biggrin:

Haha really?? Yeh its taking some patience but im getting more and more excited each and every thing i get done.

Cheers for the kind words 👍

Posted
12 hours ago, LexIS200Sport said:

Hi Rob, would you be bringing this car to the Lexus meet in April?


I would love too but there is alot more to get done and many more pennies to put into it. I will 100% be bringing it to some meets when its done 👍

  • Like 2
Posted
19 hours ago, rob_clio172 said:

I would love too but there is alot more to get done and many more pennies to put into it. I will 100% be bringing it to some meets when its done 👍

Have you considered crowd funding amongst the LOC cognoscenti? No ulterior motive, I'm sure...😉

  • Like 1
Posted
1 hour ago, gdh300 said:

Have you considered crowd funding amongst the LOC cognoscenti? No ulterior motive, I'm sure...😉

Now thats a good idea 😂

  • 3 months later...
Posted

Well its been a few months since the last update and lockdown got me thinking..... alot! 

Ideas started to change and after a grim discovery and a potential dream (and life)  ending fault occuring ive switched things up. 

1 day when going to start the car to do a bit of data logging the starter took a sh!tand was just making a clonk. Little did i know that the starter had shorted out internally and was causing the outer casing to see Battery voltage when cranking.... this coupled with the stainless steel braided fuel line just ever so slightly touching the starter on 1 the fittings caused the voltage to go down the fuel line, this then was to arc out where the fuel line was by the chassis rail. 

When electricity arcs it causes a hot spot which melted the ptfe inner lining causing fuel to blow out of the stainless line!!!! Spark and fuel..... well we all know the end result of that but i fell lucky.... very very lucky it didnt ignite but it was enough to put the fear of sh!t into me that i almost jacked it all in.

20200210_225025.thumb.jpg.318a89110c7d064e4d924c6eef2f80e4.jpg

Lesson learnt, it wasnt even like the fuel line and fitting was reating on the starter it was barely making contact but enough for electricity to pass!!

So i had to change the starter and fuel line, not a problem. Until i came to remove that lovely looking inlet mani i have, i assembled everything outside the bay and dropped it in, i never thought i would be lifting the engine out to take an intake manifold off!!!!! This you can imagine was almost the final straw and when i spotted how off the port matching was well that was it! I scrapped it and started thinking if new ideas. 

  • Confused 1
Posted

I decided to use the original lower runners and a plenum which is meant to bolt to it.

Would love post pics and show you all as this thread is pretty much useless without them but it still wont let me load them!

So instead of bolting the plenum to the runners i had it welded to 1 eliminate a gasket and 2 the thought of having bolts in the intake scared me tbh!

It wasnt an easy fit either, ive had to shape (hammer) the plenum where its close to the suspension turret. Ive also had to cut the throttle flange off and shorten the entire thing as it was just way too long.

20200417_173244.thumb.jpg.2f72a68d1ebc1fb78cf682e38852492c.jpg

Out with the pretty 1 and in with the ugly 1, function over looks i keep telling myself!

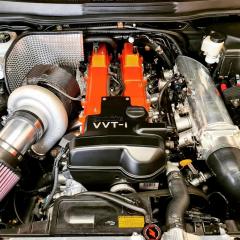
So this has now meant i need to use a new fuel rail. I got a radium engineering rail with blanks for the air assisted injector ports, it also meant i can change the fuel line configuration so instead of the 2 -6AN feeds and a -6AN return i now could use just the larger -8AN feed which i had for the original branch off and the same -6AN return. 

This simplified the fuel system alot and kept the lines to a minimum.20200514_121711.thumb.jpg.9e899fdbaaed04cd2e57de57920ae0a5.jpg20200514_121618.thumb.jpg.6e9a15e5f800347d6adb07f8014ae0b6.jpg what a piece of kit that is!!

  • Like 1
Posted

So with the new mani and fuel setup pretty much sorted i decided i no longer want air con🤣🤦‍♂️.

I know it was 1 of the comforts i wanted to keep but this has made life so much easier!!!!!

Again i cant post pictures the site sucks! 

I was then able to shift the intercooler back loads to the point the crash bar now fits back on adding that rigidity back to the front and also fitment of a standaed bumper with no cutting needed.

To get this to work though i had to attack the frame work with the grinder, cutting the end pieces off to allow the intercooler pipework to be fitted!

20200331_105415.thumb.jpg.8938c764c6fe7cb042aa6c6f3e19ae28.jpg

20200331_152126.thumb.jpg.84379a426ca7f91247df104b2ff75c68.jpg

20200427_181303.thumb.jpg.0f6fd4aa11f9931ad0c4e9b132e37d76.jpg

20200401_141131.thumb.jpg.5e3b33e8714440d81dab6a6282e64bde.jpg

Treated all the cut metal work to some dinitrol to protect it.

20200401_141215.thumb.jpg.4236d1f471b257014f9c40a1523bfc38.jpg

20200507_152337.thumb.jpg.5c5fef73023a805cb174513db846d7af.jpg

20200507_152306.thumb.jpg.8a4ffca9f5c33deed8f8c9360d845703.jpg

20200507_152651.thumb.jpg.e0fdc17afcb9778fc57b267c641996dd.jpg

i then measured cut and mocked up all the intercooler piping then had it all welded. BOV also fitted, that thing is huge!!

  • Like 2

Latest Deals

Lexus Official Store for genuine Lexus parts & accessories

Disclaimer: As the club is an eBay Partner, The club may be compensated if you make a purchase via eBay links

Create an account or sign in to comment

You need to be a member in order to leave a comment

Create an account

Sign up for a new account in our community. It's easy!

Register a new account

Sign in

Already have an account? Sign in here.

Sign In Now


Lexus Owners Club Powered by Invision Community


eBay Disclosure: As the club is an eBay Partner, the club may earn commision if you make a purchase via the clubs eBay links.

DISCLAIMER: Lexusownersclub.co.uk is an independent Lexus forum for owners of Lexus vehicles. The club is not part of Lexus UK nor affiliated with or endorsed by Lexus UK in any way. The material contained in the forums is submitted by the general public and is NOT endorsed by Lexus Owners Club, ACI LTD, Lexus UK or Toyota Motor Corporation. The official Lexus website can be found at http://www.lexus.co.uk
×
  • Create New...